Ford Mustang (1999-2004) Service Manual: Battery Tray
Removal and Installation
WARNING: Batteries normally produce explosive gases which can cause personal injury.
Therefore, do not allow flames, sparks or lighted substances to come near the battery. When charging or working near a battery, always shield your face and protect your eyes. Always provide ventilation. Failure to follow these instructions may result in personal injury.
WARNING: Keep out of the reach of children. Batteries contain sulfuric acid. Avoid contact with skin, eyes, or clothing. Also, shield your eyes when working near the battery to protect against possible splashing of the acid solution. In case of acid contact with skin or eyes, flush immediately with water for a minimum of 15 minutes and get prompt medical attention. If acid is swallowed, call a physician immediately. Failure to follow these instructions may result in personal injury.
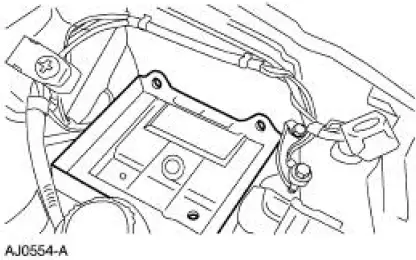
1. Remove the battery. For additional information, refer to Battery in this section.
2. Remove the battery tray bolts and washers.
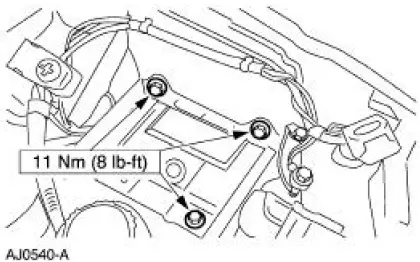
3. Remove the battery tray.
4. NOTE: When the battery is disconnected and reconnected, some abnormal drive symptoms may occur while the vehicle relearns its adaptive strategy. The vehicle needs to be driven to relearn the strategy.
To install, reverse the removal procedure.
 Battery (Removal and Installation)
Removal and Installation
WARNING: Batteries normally produce explosive gases which can
cause personal injury.
Therefore, do not allow flames, sparks or lighted substances to come
near the b ...
 Battery Cables
Removal
WARNING: Batteries normally produce explosive gases which can
cause personal injury.
Therefore, do not allow flames, sparks or lighted substances to come
near the battery. When
ch ...
Other materials:
Child seat positioning
WARNING: Airbags can kill or injure a child in a child seat.
Never place a rear-facing child seat in front of an active airbag.
If you must use a forward-facing child seat in the front seat, move the
vehicle seat upon which the child seat is installed all th ...
Assembly
1. Lubricate the differential side gear thrust washers and the differential
side gear journals, and
assemble the washers to the gears.
Use SAE 80W-90 Premium Rear Axle Lubricant XY-80W90-QL or equivalent
meeting
Ford specification WSP-M2C197-A.
2. Lub ...
Transmission (Installation)
Material
Item
Specification
DEXRON III (ATF)
Transmission Fluid
XT-2-QDX or equivalent
DEXRON III
Pipe Sealant with Teflon
D8AZ-19554-A or equivalent
WSK-M2G350-
A2
Premium Long Life Grease
XG-1-C, K or T or equivalent
...
