Ford Mustang (2005-2014) Owners Manual: HomeLinkÂź wireless control system
WARNING: Make sure that the garage door and security device are free from obstruction when you are programming. Do not program the system with the vehicle in the garage.
WARNING: Do not use the system with any garage door opener that does not have the safety stop and reverse feature as required by U.S. Federal Safety Standards (this includes any garage door opener manufactured before April 1, 1982).
Note: Make sure you keep the original remote control transmitter for use in other vehicles as well as for future system programming.
Note: We recommend that upon the sale or lease termination of your vehicle, you erase the programmed function buttons for security reasons.
See Erasing the function button codes later in this section.
Note: You can program a maximum of three devices. To change or replace any of the three devices after it has been initially programmed, you must first erase the current settings. See Erasing the function button codes later in this section.

The universal garage door opener replaces the common hand-held garage door opener with a three-button transmitter that is integrated into the driverâs sun visor.
The system includes two primary features, a garage door opener and a platform for remote activation of devices with the home. As well as being programmed for garage doors, the system transmitter can be programmed to operate entry gate operators, security systems, entry door locks, and home or office lighting.
Additional system information can be found online at www.homelink.com or by calling the toll-free help line on 1-800-355-3515.
Programming
Note: Put a new battery in the hand-held transmitter. This will ensure quicker training and accurate transmission of the radio-frequency signal.
1. With your vehicle parked outside of the garage and your key in the ignition, turn the key so that the ignition is in the on position.
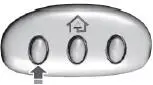
2. Hold your hand-held, garage door
transmitter 1â3 inches (2â8 centimeters)
away from the HomeLink button you want
to program.
3. Using both hands, simultaneously press
and hold the desired HomeLink button
and the hand-held transmitter button.
DO NOT release either one until the
HomeLink indicator light flashes slowly and then rapidly. When the
indicator light flashes rapidly, both buttons may be released. The rapid
flashing indicates successful training.
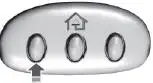
4. Press and hold the HomeLink button you programmed for five
seconds, then release. You may need to do this twice to activate the
door. If your garage door does not operate, watch the HomeLink
indicator light.
If the indicator light stays on, the programming is complete. Press and release the programmed HomeLink button, and then begin programming your garage door opener. See below for Steps 5 â 7.
If the indicator light flashes rapidly for two seconds and then turns to a constant light, the HomeLink button is not programmed yet. Do the following: Press and hold the HomeLink button while you press and release the hand-held transmitter button every two seconds. The HomeLink indicator light will flash slowly and then rapidly once the HomeLink function button recognizes and accepts the hand-held transmitterâs radio frequency signal.
After programming the HomeLink button, follow Steps 5 â 7 as listed below to program your garage door opener.
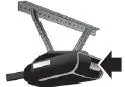
Note: You may need a ladder to reach the unit and you may need to remove the cover or lamp lens on your garage door opener.
5. Press the learn button on the garage door
opener motor, and then you have 30 seconds
to complete the next step.
6. Return to your car.
7. Press and hold the function button you want to program for two seconds, then release. Repeat this step. Depending on your brand of garage door opener, you may need to repeat this sequence a third time.
To program additional buttons, repeat Steps 1 â 4 .
For questions or comments, please contact HomeLinkÂź at www.homelink.com or 1-800-355-3515.
Erasing the Function Button Codes
Note: You cannot erase individual buttons.
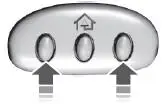
1. Press and hold the outer two function
buttons simultaneously for approximately
20 seconds until the indicator lights above
the buttons flash rapidly.
2. When the indicator lights flash, release
the buttons. The codes for all buttons are
erased.
Reprogramming a single button
To program a device to a previously trained button, follow these steps:
1. Press and hold the desired button. Do NOT release the button.
2. The indicator light will begin to flash after 20 seconds. Without
releasing the button, follow Step 1 in the Programming section.
For questions or comments, contact HomeLinkÂź at www.homelink.com or 1-800-355-3515.
Programming HomeLink to a Genie Intellicode 2 garage door opener
Note: The Genie Intellicode 2 transmitter must already be programmed to operate with the garage door opener.
Programing the transmitters
To program HomeLink to the transmitter you must first put the transmitter into programming mode. To do this:
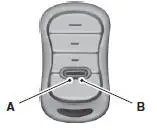
A. Red LED
B. Green LED
1. Press and hold one of the buttons on the hand-held transmitter for
10 seconds. The LED light will change from green to green and red.
2. Press the same button twice to confirm the change to Programming
mode. If done properly the LED light will appear red.
3. Hold the transmitter within 1â3 inches (2â8 centimeters) of the
button on the sun visor you want to program.
4. Press and hold both the programmed Genie button on the hand-held
transmitter and the button on the sun visor you want to program.
The indicator light on the sun visor will flash rapidly when the programming is successful.
Note: the Genie transmitter will transmit for up to 30 seconds. If HomeLink does not program within 30 seconds the Genie transmitter will need to be pressed again. If the Genie transmitter LED displays green and red, release the button until the LED turns off before pressing the button again.
Once HomeLink has been programmed successfully, the Genie transmitter must be changed out of program mode. To do this:
1. Press and hold the previously programmed Genie button on the
hand-held transmitter for 10 seconds. The indicator light will change
from red to red and green.
2. Press the same button twice to confirm the change. If done correctly
the LED will turn green.
Programming HomeLink to the Genie Intellicode garage door opener motor
Note: You may need a ladder to access the garage door opener motor.
To program HomeLink to the garage
door opener motor:
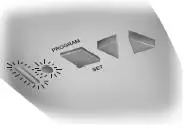
1. Press and hold the PROGRAM
button on the garage door opener
motor until both blue LEDâs turn on.
2. Release the PROGRAM button.
Only the smaller round LED should
be on.
3. Press and release the program
button. The larger purple LED will
flash
Note: The next two steps must be completed in 30 seconds.
4. Press and release the Genie Intellicode 2 hand-held transmitterâs
previously programmed button. Both indicator lights on the garage door
opener motor unit should now flash purple.
5. Press and hold the previously programmed button on the sun visor for
two seconds. Repeat this step up to 3 times until the garage door moves.
Programming is now complete.
Clearing a HomeLink device
To erase programming from the three HomeLink buttons, press and hold the two outer HomeLink buttons until the indicator light begins to flash.
The LED will begin flashing in 10 to 20 seconds, at which time both buttons should be released. Programming has now been erased, and the LED should blink slowly to indicate the device is in train mode when any one of the three HomeLink buttons is pressed.
FCC and RSS-210 Industry Canada Compliance
This device complies with Part 15 of the FCC Rules and with RSS-210 of Industry Canada. Operation is subject to the following two conditions: (1) this device may not cause harmful interference, and (2) this device must accept any interference received, including interference that may cause undesired operation.
Changes or modifications to your device not expressly approved by the party responsible for compliance can void the userâs authority to operate the equipment.
 Car2UÂź home automation system
WARNING: Make sure that the garage door and security device
are free from obstruction when you are programming. Do not
program the system with the vehicle in the garage.
WARNING: Do not use the system ...
 Auxiliary Power Points
WARNING: Do not plug optional electrical accessories into the
cigarette lighter socket (if equipped). Improper use of the lighter
can cause damage not covered by your warranty, and can result in fire
...
Other materials:
Component Tests
Engine Oil Leaks
NOTE: When diagnosing engine oil leaks, the source and location of
the leak must be positively
identified prior to repair.
Prior to carrying out this procedure, clean all sealing surface areas with a
suitable solvent to remove all
tra ...
Removal
CAUTION: Suspension fasteners are critical parts because they affect
performance of vital
components and systems and their failure can result in major service expense. A
new part with
the same part number must be installed if installation becomes necessary. ...
Horn (Diagnosis and Testing)
Refer to Wiring Diagrams Cell 44 , Horns/Cigar Lighter for schematic
and connector information.
Special Tool(s)
73 Digital Multimeter or
equivalent
105-R0051
Inspection and Verification
1. Verify the customer concern by operating the h ...
