Ford Mustang (2005-2014) Owners Manual: Sensing system
WARNING: To help avoid personal injury, please read and understand the limitations of the system as contained in this section. Sensing is only an aid for some (generally large and fixed) objects when moving in reverse on a flat surface at parking speeds.
Traffic control systems, inclement weather, air brakes, and external motors and fans may also affect the function of the sensing system; this may include reduced performance or a false activation.
WARNING: To help avoid personal injury, always use caution when the transmission is in R and when using the sensing system.
WARNING: This system is not designed to prevent contact with small or moving objects. The system is designed to provide a warning to assist the driver in detecting large stationary objects to avoid damaging the vehicle. The system may not detect smaller objects, particularly those close to the ground.
WARNING: Certain add-on devices, such as large trailer hitches, bike or surfboard racks and any device that may block the normal detection zone of the system, may create false beeps.
Note: Keep the sensors (located on the bumper/fascia) free from snow, ice and large accumulations of dirt. If the sensors are covered, the system’s accuracy can be affected. Do not clean the sensors with sharp objects.
Note: If your vehicle sustains damage to the bumper/fascia, leaving it misaligned or bent, the sensing zone may be altered causing inaccurate measurement of obstacles or false alarms.
The sensing system warns the driver of obstacles within a certain range of the bumper area. The system turns on automatically whenever the ignition is switched on.
When receiving a detection warning, the radio volume is reduced to a predetermined level. After the warning goes away, the radio volume returns to the previous level.
The system can be turned off using the information display control. See the Information Display chapter. If a fault is present in the system, a warning message appears in the information display and does not allow the driver to switch the faulted system on.
Using the Rear Sensing System
The rear sensors are only active when the transmission is in R. As the vehicle moves closer to the obstacle, the rate of the audible warning increases. When the obstacle is fewer than 12 inches (30 centimeters) away, the warning sounds continuously. If a stationary or receding object is detected farther than 12 inches (30 centimeters) from the side of the vehicle, the tone sounds for only three seconds. Once the system detects an object approaching, the warning sounds again.
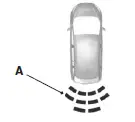
A. Coverage area of up to 6 feet (2 meters) from the rear bumper (with a decreased coverage area at the outer corners of the bumper).
The system detects certain objects while the transmission is in R:
• and moving toward a stationary object at a speed of 3 mph (5 km/h)
or less.
• but not moving, and a moving object is approaching the rear of the
vehicle at a speed of 3 mph (5 km/h) or less.
 Parking Aids
...
 Rear-view camera system
WARNING: The rear view camera system is a reverse aid
supplement device that still requires the driver to use it in
conjunction with the interior and exterior mirrors for maximum
coverage.
WARNING: Ob ...
Other materials:
Removal
CAUTION: Suspension fasteners are critical parts because they affect
performance of vital
components and systems and their failure can result in major service expense. A
new part with
the same part number must be installed if installation becomes necessary. ...
Installation
LH mount
1. Position the engine mount and install the bolt and studbolts.
2. Attach the ground cables and install the nuts.
RH mount
3. Position the engine mount and install the bolts and studbolt.
4. Attach the wiring harness and install the nut.
Both ...
Lock Cylinder - Door
Removal
1. NOTE: Individual lock cylinders are repaired by discarding the
inoperative cylinder and building
a new lock cylinder using the appropriate lock repair package. The lock
repair package includes
a detailed instruction sheet to build the ne ...
