Ford Mustang (1999-2004) Service Manual: Speakers
Torque Specifications
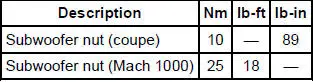
Speakers
NOTE: Premium sound speakers (18808) are labeled with either 6 OHMS or 8 OHMS.
- The coupe has a four-speaker system, with two door-mounted speakers and two in the package tray panel (46506).
- On the convertible, the two rear speakers are located behind the quarter trim panel. (31012)
- The MACH 460 subwoofer system has eight speakers. On the coupe, two are located in each door and four are in the subwoofer assembly. On the convertible, two speakers are in each door and two are mounted in each subwoofer assembly behind the rear quarter trim panels. Both the coupe and convertible subwoofer assemblies are not repairable.
- The MACH 1000 has all the components of the MACH 460 system plus two additional subwoofers located on each side of the trunk and four additional amplifiers. These subwoofers can be serviced independently.
 Cable - Antenna Lead In
Removal
1. Remove the audio unit. Refer to Section.
2. Lower the glove compartment by releasing the stops from the
instrument panel.
3. Disconnect the antenna in-line connector.
4. Remove ...
 Door Speaker - Upper
Removal and Installation
1. Remove the front door trim panels (239420). For additional
information, refer to Section
2. Remove the upper speaker access cover.
3. Remove the upper speaker hous ...
Other materials:
Electronic Engine Controls (Description and Operation)
The electronic engine controls consist of the following:
powertrain control module (PCM)
throttle position (TP) sensor
idle air control (IAC) valve
engine coolant temperature (ECT) sensor
cylinder head temperature sensor
camshaft position ...
Front Seat Backrest
Removal and Installation
All vehicles
1. Remove the seat. For additional information, refer to Seat-Front Power
in this section.
2. Remove the front seat backrest latch. For additional information, refer
to Latch-Front Seat
Backrest in this section.
...
Crash sensors and airbag indicator
WARNING: Modifying or adding equipment to the front end of
your vehicle (including frame, bumper, front end body structure
and tow hooks) may affect the performance of the airbag system,
increasing the risk of injury. Do not modify the front end of your
vehicl ...
