Ford Mustang (1999-2004) Service Manual: Throttle Body
Removal and Installation
WARNING: Do not smoke or carry lighted tobacco or open flame of any type when working on or near any fuel related components. Highly flammable mixtures are always present and can ignite. Failure to follow these instructions can result in personal injury.
CAUTION: The throttle body bore and plate area have a special coating and cannot be cleaned.
1. Remove the air cleaner outlet tube. For additional information, refer to Section.
2. Disconnect the throttle position (TP) sensor and the idle air control (IAC) valve electrical connectors.

3. Disconnect the accelerator controls.
- Disconnect the accelerator cable.
- If equipped, disconnect the speed control cable.
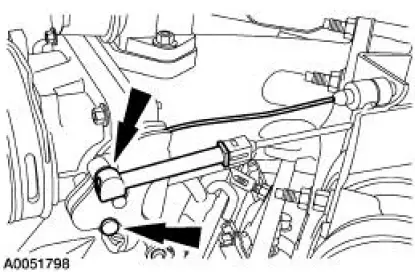
4. NOTE: Discard the throttle body gasket after removing the throttle body.
Remove the bolts and the throttle body.
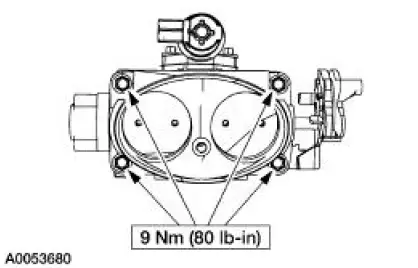
5. NOTE: Install a new throttle body gasket.
To install, reverse the removal procedure.
 Fuel Charging Wiring Harness
Removal and Installation
WARNING: Do not smoke or carry lighted tobacco or open flame of any
type when
working on or near any fuel related components. Highly flammable mixtures are
always present
an ...
Other materials:
Knob
Removal
1. Remove the shifter top control panel.
2. Disconnect the electrical connectors.
3. Remove the shifter bezel.
4. Remove the bulb from the bezel.
5. Disconnect the TCS connector.
6. CAUTION: Extra force may be needed to lift up on the handle. Do ...
Refrigerant System Filtering Following Air Conditioning (A/C) Component
Installation
Special Tool(s)
Set, A/C Fittings
412-DS028 (014-00333, D93L-
19703-B) or equivalent
1. Install the new A/C compressor. For additional information, refer to
Section.
2. Install the new suction accumulator/drier. For additional information, ...
Installation
WARNING: To reduce the risk of serious personal injury, read
and follow all warnings,
cautions and notes at the beginning of the removal procedure.
1. Install the passenger air bag module.
1. Position the passenger air bag module into the instrume ...
