Ford Mustang (2005-2014) Owners Manual: Autolamps
WARNING: In severe weather conditions, it may be necessary to switch your headlamps on manually.
Note: If the vehicle is equipped with autolamps, it will have the windshield wiper rainlamp feature. When the windshield wipers are turned to low- or high-speed wiping during daylight, and the headlamp control is in the autolamp position, the exterior lamps will turn on after a brief delay and will remain on until the wipers are turned off.
The autolamp system provides light sensitive automatic on-off control of the exterior lights normally controlled by the headlamp control.
The headlamps will remain on for a period of time after you switch the ignition off. You can adjust the time delay using the display controls in the instrument cluster. See the Information Displays chapter.
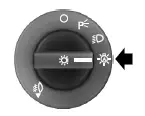
 Lighting control
A. Off
B. Parking lamps, instrument panel
lamps, license plate lamps and tail
lamps
C. Headlamps
High Beams
• Push the lever toward the
instrument panel to switch
on the high beams.
• Pull the l ...
 Instrument lighting dimmer
• Move the control up or down to
adjust the intensity of the panel
lighting.
• Move the control to the full
upright position, past detent,
to turn on the interior lamps.
• Move the control down ...
Other materials:
Supercharger Belt Tensioner
Removal and Installation
1. Remove the supercharger drive belt cover.
2. Rotate the supercharger belt tensioner clockwise and remove the
supercharger belt.
3. Remove the bolts and the supercharger belt tensioner.
4. To install, reverse the removal proced ...
Engine System - General Information
General Specifications
Engine
NOTE: This section contains information, steps and procedures that may
not be specific to your
engine.
This section covers general procedures and diagnosis and testing of the engine
system, except for
exhaust emission control ...
Window Glass - Door
Removal
1. Remove the door trim panel. For additional information, refer to
Section.
2. Remove the interior weatherstrip.
3. Remove the bolts and the stabilizers.
4. Remove the bolts and the upstop brackets.
5. Remove the rivet and the exterior w ...
