Ford Mustang (2005-2014) Owners Manual: Opening the convertible top
Note: Do not store articles behind rear seat. Articles stored in the convertible top stowage compartment may break the rear glass window when the top is opened.
Note: Opening the convertible top when the top material is wet may cause mold or mildew.
The convertible top can be opened with the side windows down. The windows will automatically lower when opening or closing the top.
The convertible top will not operate unless the vehicle is stationary or traveling under 3 mph (5 km/h).
To open the convertible top:
1. Bring the vehicle to a complete stop. The ignition must be on. It is
recommended that the engine is running when opening the top to
prevent draining the battery.
2. Check the convertible top stowage compartment behind the rear seat
to be sure it is empty. Make sure the convertible top outer surface is free
of debris.
Note: The latch handles must be pulled downward fully to allow the latch to fully rotate into the open position.
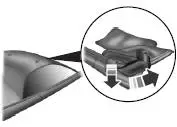
3. Unclamp the top from the windshield header by pulling each latch handle down and then rotating the latch to the rear until it clears the header.
Note: If the top has not been opened for some time and sticks to the windshield header, push the front of the top up slightly with your hand to loosen it.
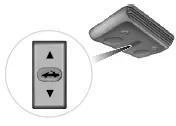
4. Press and hold the convertible top switch on the overhead console until the windows are completely down and the top is completely stored.

 Using the boot
Installing the Boot
WARNING: Always secure the retaining clips and boot straps on
the vehicle or the boot may come loose while driving.
Note: Be sure the boot is secure on the vehicle before driving. ...
Other materials:
Acceleration Control (Diagnosis and Testing)
Inspection and Verification
1. Verify the customer's concern by operating the acceleration control system
to duplicate the
condition.
2. Inspect to determine if any of the following mechanical concerns apply:
Visual Inspection Chart
Mechanical
...
Cable and Bracket
Removal
1. Raise the vehicle on a hoist. For additional information, refer to
Section.
2. Remove the cable shift from the shifter lever and bracket and discard
the clip.
3. Remove the bolt from the cable.
4. Remove the bolt from the cable.
5. ...
Pinpoint Test N: DTC B1869 - Air Bag Indicator Inoperative
Normal Operation
The air bag indicator is designed to illuminate for 6 (+/-2) seconds when
the ignition switch is turned to
the RUN position. This initial 6 seconds of illumination is considered
normal operation and is called
proveout of the air bag ind ...
