Ford Mustang (2005-2014) Owners Manual: Power seats
WARNING: Never adjust the driver’s seat or seat back when the vehicle is moving.
WARNING: Before returning the seat back to its original position, make sure that cargo or any objects are not trapped behind the seat back.
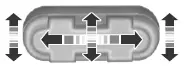
The power seat control is located on the outboard side of the seat.
Move the switch in the direction of the arrows to raise or lower the seat cushion or to move the seat forward, backward, up or down.
Power Lumbar (If Equipped)
The power lumbar control is located on the top of the driver’s seat side shield.

Press one side of the control to increase lower back firmness.
Press the other side of the control to decrease lower back firmness.
 Manual seats
WARNING: Do not adjust the driver’s seat or seatback while the
vehicle is moving.
WARNING: Rock the seat backwards and forwards after
releasing the lever to make sure that it is fully engaged.
Movi ...
 Heated seats
WARNING: Persons who are unable to feel pain to the skin
because of advanced age, chronic illness, diabetes, spinal cord
injury, medication, alcohol use, exhaustion, or other physical conditions,
must ...
Other materials:
Engine oil check
Note: Check the level before starting the engine.
Note: Make sure that the level is between the MIN and MAX marks.
1. Make sure that your vehicle is on level ground.
2. Turn the engine off and wait 10 minutes for the oil to drain into the
oil pan.
3. Remove ...
Bumpers
Torque Specifications
Bumpers
CAUTION: Never apply excessive heat to the bumper cover surface. Heat
could cause
distortion of the bumper cover.
The bumper systems consist of the following components:
front bumper
front bumper cover
front bumper cover (Co ...
Fill
1. WARNING: Do not mix oil types, any mixture or any unapproved oil can
lead to seal
deterioration and leaks. A leak can ultimately cause loss of fluid, which can
result in a
loss of power steering assist.
Check the fluid level. If necessary, fill the reserv ...
