Ford Mustang (1999-2004) Service Manual: Removal
WARNING: Do not smoke, carry lighted tobacco or an open flame of any type when working on or near any fuel-related components. Highly flammable mixtures are always present and may be ignited, possibly resulting in personal injury.
WARNING: Fuel supply lines on all vehicles equipped with fuel injected engines will remain pressurized for long periods of time after engine shutdown. Fuel system pressure must be relieved prior to fuel system service to prevent possible personal injury or a fire hazard.
1. Disconnect the battery. For additional information, refer to Section.
2. Relieve the fuel system pressure. For additional information, refer to Section.
3. Drain the fuel tank. For additional information, refer to Section.
4. Raise the vehicle. For additional information, refer to Section.
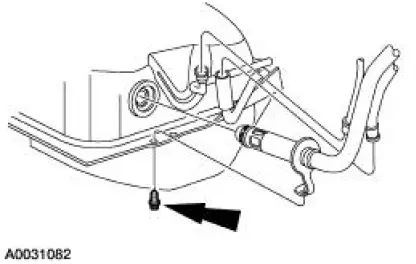
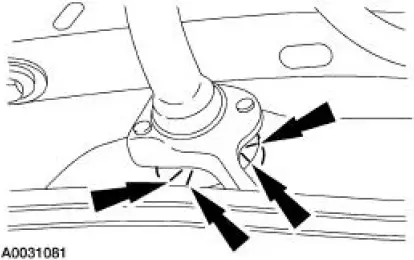
5. Remove the filler pipe bolt and disconnect the filler pipe hose connections to the fuel tank.
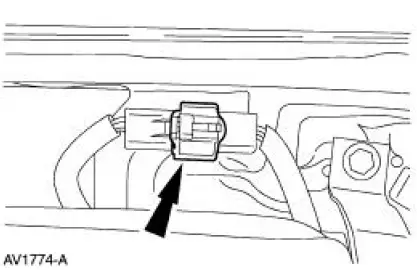
6. Disconnect the fuel tank electrical connector.
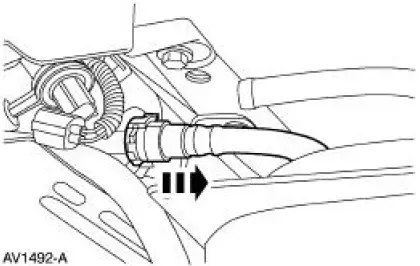
7. Disconnect the vapor tube fitting at the left front of the fuel tank.

8. Disconnect the EVAP canister tube and hose.
9. Place a safety support under the fuel tank.
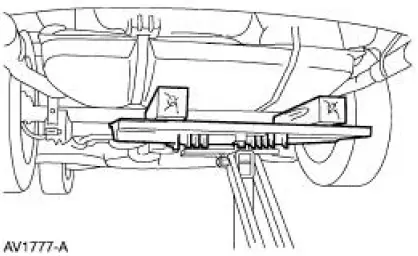
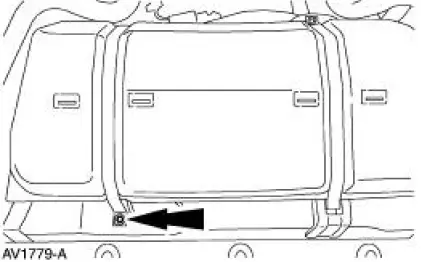
10. Remove the front bolts from the fuel tank support straps and swing the LH strap out of the way.
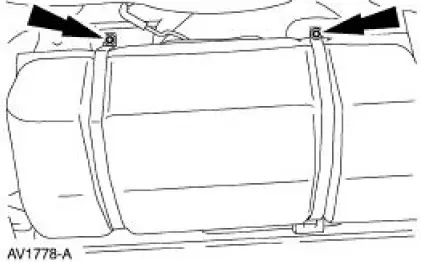
11. Remove the RH fuel tank support strap bolt and remove the strap.
12. Partially lower the fuel tank and disconnect the fuel line.
13. CAUTION: The filler pipe grommet must be removed prior to removing the fuel tank from the filler pipe or damage to the fill tube check valve will occur.
Cut outer edge of pipe-to-tank grommet to facilitate pipe removal and carefully remove the grommet from the fuel tank. Take care to avoid damage to the filler pipe check valve.
14. Lower the fuel tank from the vehicle.
 Fuel Tank
Material
Item
Specification
Serfactant
(Merpol)
ESE-M99B144-B
...
 Installation
1. CAUTION: Lubricate the filler pipe check valve area and the
tank-to-filler pipe
grommet with Serfactant prior to assembly or damage to the filler pipe check
valve will
occur.
NOTE: A new grommet ...
Other materials:
Air Conditioning (A/C) Compressor - 3.8L
Material
Item
Specification
PAG Refrigerant Compressor
Oil (R-134a Systems)
F7AZ-19589-DA (Motorcraft YN-
12-C)
WSH-M1C231-
B
Removal and Installation
CAUTION: If installing a new air conditioning compressor due to an
internal failur ...
General information
WARNING: Driving while distracted can result in loss of vehicle
control, accident and injury. Ford strongly recommends that drivers
use extreme caution when using any device or feature that may take their
focus off the road. Your primary responsibility is the ...
Transmission (Assembly)
Special Tool(s)
Dial Indicator Gauge with
Holding Fixture
100-002 (TOOL-4201-C) or
equivalent
Holding Fixture, Transmission
307-003 (T57L-500-B)
Remover/Installer, Bearing
Tube
308-025 (T75L-7025-C)
In ...
