Ford Mustang (1999-2004) Service Manual: Transmission Fluid Drain and Refill
Special Tool(s)
|
|
Automatic Transmission Flush and Fill Machine 211-00018 Automatic Transmission Flush and Fill Machine 199-00010 or equivalent |
Material
| Item | Specification |
| MERCON V Automatic Transmission Fluid XT-5-QM | MERCONV |
Draining
CAUTION: Always refer to the instructions supplied with the flush and fill machine.
NOTE: Draining fluid from the transmission by removing only the fluid pan is acceptable for vehicles that do not have a torque converter drain plug, for normal or severe duty fluid maintenance.
NOTE: A new procedure for draining and adding transmission fluid using a suitable transmission flush and fill machine has been added. The following procedure has different methods for draining and refilling the listed vehicles:
All vehicles using a suitable flush and fill machine.
Vehicles equipped with a torque converter drain plug.
Vehicles without a torque converter drain plug.
Use the method that is applicable to your vehicle.
All vehicles using a suitable flush and fill machine
1. With the vehicle in NEUTRAL, position on a hoist. For additional information, refer to Section.
2. Use a suitable flush and fill machine to change the fluid.
3. When connecting the flush and fill machine, connect the machine to the fluid cooler tube after the fluid cooler on the cooler return line. This will help remove any foreign material trapped in the fluid coolers.
Refill
4. Use only clean automatic transmission fluid.
5. Once the fluid exchange has been completed, disconnect the flush and fill machine. Reconnect any disconnected fluid cooler tubes.
6. With the engine running and the transmission at normal operating temperature 66-77C (150- 170F), check and adjust the transmission fluid level, and check for any leaks. If fluid is needed, add fluid in increments of 0.24-liter (0.5-pint) until the correct level is achieved (fluid should be in the cross-hatched area of the fluid level indicator).
Draining
Vehicles equipped with a torque converter drain plug
1. With the vehicle in NEUTRAL, position on a hoist. For additional information, refer to Section.
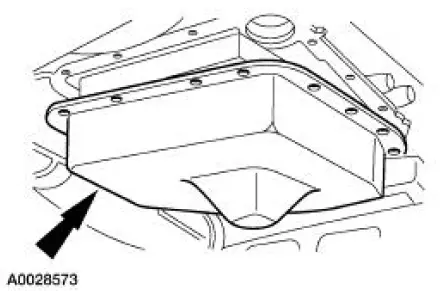
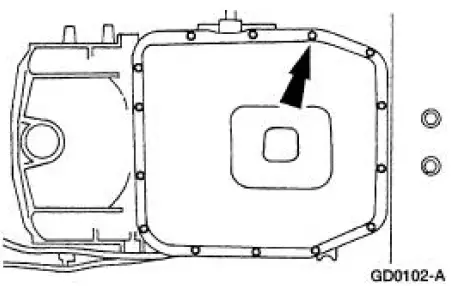
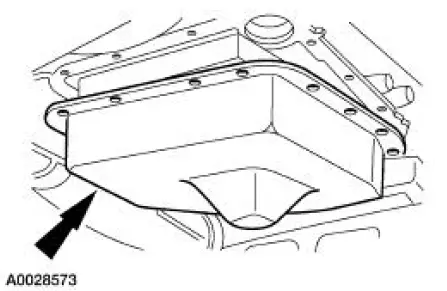
2. Loosen the transmission fluid pan bolts and allow the fluid to drain.

3. After the fluid has drained, remove the transmission fluid pan.
4. Do not remove the fluid filter. It is not necessary to change the fluid filter during a normal maintenance fluid change.
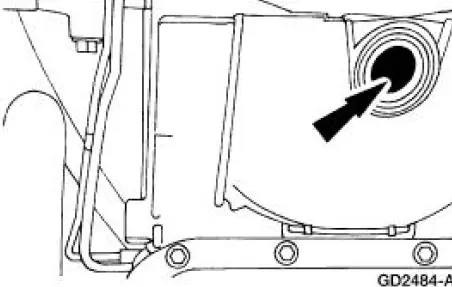
5. Remove the torque converter drain plug cover.
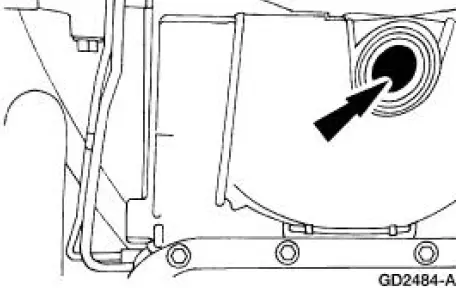
6. Remove the torque converter drain plug and discard.

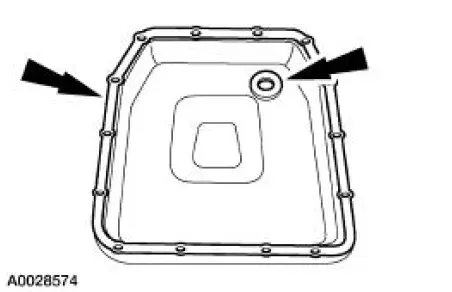
7. Clean and inspect the transmission fluid pan, transmission fluid pan gasket and magnet.
8. Thoroughly flush the cooler tubes. For additional information, refer to Transmission Fluid Cooler - Backflushing and Cleaning in this section.
Refill
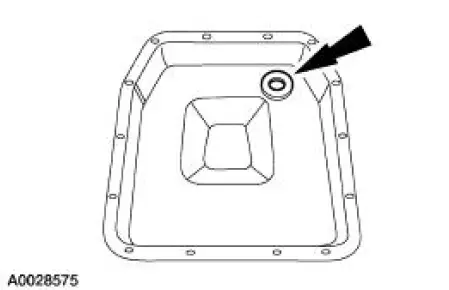
9. After the torque converter has drained, install a new drain plug.
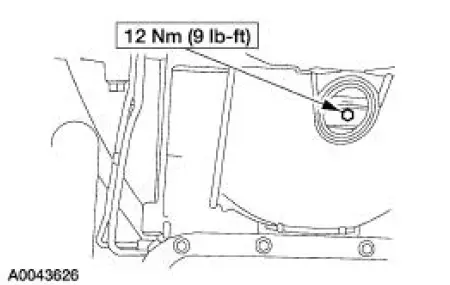
10. Install the torque converter drain plug cover.
11. Position the magnet into the transmission fluid pan.
12. NOTE: The fluid pan gasket is reusable, clean and inspect for damage. If not damaged, the gasket should be reused.
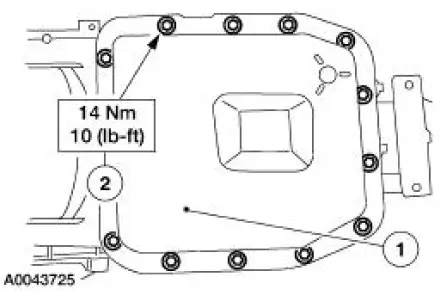
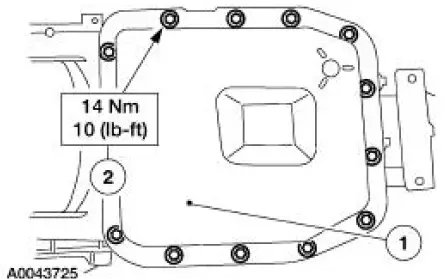
Install the fluid pan and gasket.
1. Position the fluid pan with the gasket in place.
2. Install the bolts.
13. CAUTION: The use of any other transmission fluid can result in the transmission failing to operate in a normal manner or transmission failure.
Fill the transmission.
- Add 4.7 liters (5 qts) of clean automatic transmission fluid to the transmission through the fluid filler tube.
14. Start the engine. Move the transmission range selector lever through all the gear ranges, checking for engagements.
15. With the engine running and the transmission at normal operating temperature 66-77C (150-170F), check and adjust the transmission fluid level, and check for any leaks. If fluid is needed, add fluid in increments of 0.24-liter (0.5-pint) until the correct level is achieved (fluid should be in the cross-hatched area of the fluid level indicator).
Draining
Vehicles without a torque converter drain plug
1. With the vehicle in NEUTRAL, position on a hoist. For additional information, refer to Section
2. Loosen the transmission fluid pan bolts and allow the fluid to drain.
3. After the fluid has drained, remove the transmission fluid pan.
4. Do not remove the fluid filter. It is not necessary to change the fluid filter during a normal maintenance fluid change.
5. Clean and inspect the transmission fluid pan, transmission fluid pan gasket and magnet.

6. Thoroughly flush the cooler tubes. For additional information, refer to Transmission Fluid Cooler - Backflushing and Cleaning in this section.
Refill
7. Position the magnet into the transmission fluid pan.

8. NOTE: The fluid pan gasket is reusable, clean and inspect for damage. If not damaged, the gasket should be reused.
Install the fluid pan and gasket.
1. Position the fluid pan with the gasket in place.
2. Install the bolts.
9. CAUTION: The use of any other transmission fluid can result in the transmission failing to operate in a normal manner or transmission failure.
Fill the transmission.
- Add 4.7 liters (5 qts) of clean automatic transmission fluid to the transmission through the fluid filler tube.
10. Start the engine. Move the transmission range selector lever through all the gear ranges, checking for engagements.
11. With the engine running and the transmission at normal operating temperature 66-77C (150- 170F), check and adjust the transmission fluid level, and check for any leaks. If fluid is needed, add fluid in increments of 0.24-liter (0.5-pint) until the correct level is achieved (fluid should be in the cross-hatched area of the fluid level indicator).
 Transmission Fluid Cooler - Backflushing and Cleaning
1. CAUTION: Do not use any supplemental transmission fluid
additives or cleaning
agents. The use of these products could cause internal transmission
components to fail;
this will effect the oper ...
 Fluid Pan, Gasket and Filter
Material
Item
Specification
MERCON V Automatic
Transmission Fluid
XT-5-QM, XT-5-DM
MERCON V
1. Normal maintenance requires periodic automatic transmission fluid changes.
If a ma ...
Other materials:
Disassembly
1. Inspect the clutch cylinder thrust surfaces, piston bore and clutch plate
serrations for scores or
burrs. Minor scores or burrs may be removed with crocus cloth. Install a new
clutch cylinder if it
is badly scored or damaged.
2. Check the fluid passage i ...
Installation
1. Align the blend door driver to the full heat position.
2. Place the temperature control knob in the full WARM position.
3. Attach the cable drive to the control head.
4. Rotate the knob back and forth from full WARM to full COOL.
5. Check the cable ...
Sitting in the correct position
WARNING: Sitting improperly out of position or with the seat
back reclined too far can take off weight from the seat cushion
and affect the decision of the passenger sensing system, resulting in
serious injury or death in a crash. Always sit upright against yo ...
