Ford Mustang (1999-2004) Service Manual: Wiper Blade and Pivot Arm Adjustment
1. Cycle and park the windshield wipers.
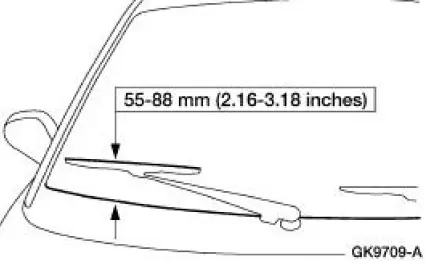
2. Verify that the distance between the center of the RH windshield wiper blade and the top edge of the cowl top vent panel is within specification.
3. Verify that the distance between the center of the LH windshield wiper blade and the top edge of the cowl top vent panel is within specification.
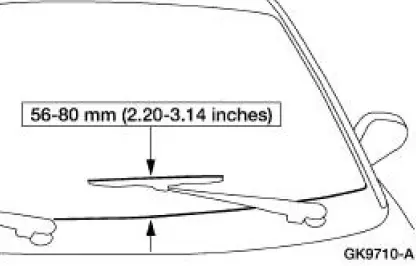
4. If the distance is not within specification, remove the windshield wiper pivot arms and reposition to specification.
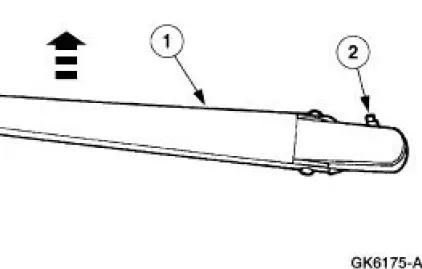
Remove the pivot arm.
1. Pull up on the pivot arm.
2. Pull out on the retainer tab and remove the pivot arm.

Pivot Arm
Removal
1. NOTE: New windshield wiper pivot arms need to be installed as an assembly.
Remove the pivot arm.
1. Pull up on the pivot arm.
2. Pull out on the retainer tab and remove the pivot arm.
Installation
1. To install, reverse the removal procedure.
 Component Test
Windshield Wiper Motor
CAUTION: Do not handle the wiper motor abusively when
diagnosing the wiper
operations. Failure to follow this caution may result in damage to the
motor magnets and wil ...
 Mounting Arm and Pivot Shaft
Removal
1. Park the windshield wipers in the full upright position. This will
allow for easy access to the
retaining clip on the wiper motor output shaft.
2. Remove the cowl top vent panels.
...
Other materials:
Column
Removal and Installation
All vehicles
1. Disconnect the battery ground cable and wait at least one minute to allow
the depletion of the
restraint system backup power supply.
2. WARNING: To avoid the risk of serious personal injury, follow all
warnings,
c ...
Starter Motor - 3.8L
Removal
WARNING: When servicing starter motor (11002) or carrying out other
underhood work in
the vicinity of the starter motor, be aware that the heavy gauge battery
input lead at the starter
solenoid (11390) is "electrically hot" at all times. A prote ...
Driveline System - General Information
Driveline Angles @ Curb Specifications
All driveshaft and pinion angles point downward.
General Specifications
a: Service refill capacities are determined by filling the axle 6.3 mm (0.25
in [1/4 in]) to 14.3 mm (0.57 in
[5/16 in]) below the bottom of the ...
