Ford Mustang (1999-2004) Service Manual: Vacuum Control Motor - Air Damper Door
Removal
1. Remove the instrument panel. For additional information, refer to Section.
2. Disconnect the vacuum hose.
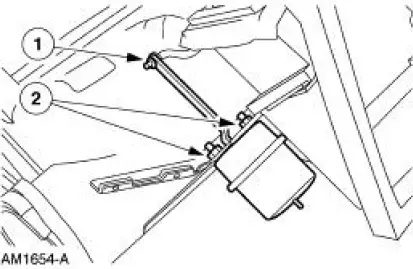
3. Remove the vacuum control motor.
1. Remove the steel clip.
2. Loosen the nuts.
Installation
1. To install, reverse the removal procedure.
Vacuum Control Motor -Windshield/Defroster Door
Removal
1. Remove the instrument panel. For additional information, refer to Section.
2. Unclip the control arm.
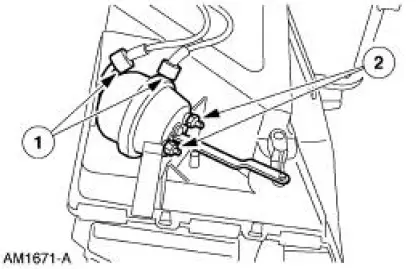
3. Remove the vacuum control motor.
1. Disconnect the vacuum lines.
2. Loosen the nuts.
Installation
1. To install, reverse the removal procedure.
Vacuum Reservoir Tank
Removal
1. Access the vacuum reservoir tank through the glove compartment.
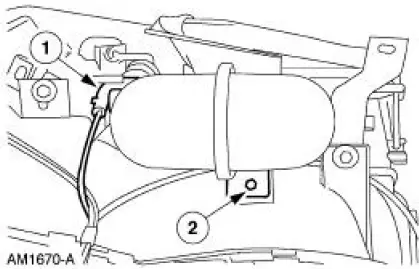
2. Remove the reservoir.
1. Disconnect the vacuum connector.
2. Remove the screw.
Installation
1. To install, reverse the removal procedure.
 Vacuum Control Motor - Air Inlet Duct Door
Removal
1. Remove the instrument panel.
2. Disconnect the vacuum hose.
3. Disconnect the control arm.
4. Remove the vacuum control motor.
Remove the screws.
Installation
1. To install, reve ...

Other materials:
Status bars
The top status bar shows the
current mode, exterior temperature,
time and display icons if you have
enabled Bluetooth or other options.
The bottom status bar shows the
Home icon and may show the
current driver and passenger
selected temperatures, fan speed a ...
Rear Drive Axle/Differential - Ford 8.8-Inch Ring Gear
General Specifications
Torque Specifications
Description
Nm
lb-ft
lb-in
Bolt retaining the differential pinion shaft to the
differential case
30
22
-
Bolt retaining the driveshaft yoke to the pinion flange
112
83
-
...
Removal
1. Remove the air intake scoop bracket. For additonal information, refer to
Section.
2. Remove the air cleaner outlet tube. For additional information, refer to
Section.
3. Disconnect the accelerator cable, the speed control actuator cable and the
return ...
