Ford Mustang (1999-2004) Service Manual: Camshaft End Play - Push Rod Engines
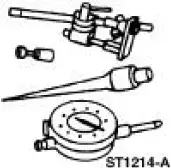
Special Tool(s)
|
|
Dial Indicator Gauge with Holding Fixture 100-002 (TOOL-4201-C) or equivalent |
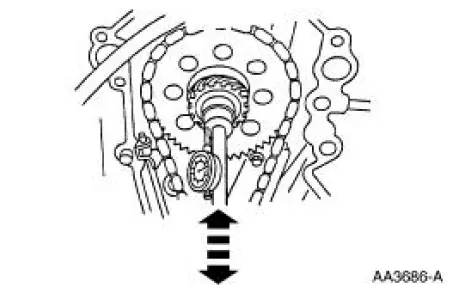
1. Remove the valve tappets. Refer to the appropriate section in Group 303 for the procedure.
2. Use a Dial Indicator Gauge with Holding Fixture to measure camshaft end play.
3. Position the camshaft to the rear of the cylinder block.
4. Zero the indicator.
5. Move the camshaft to the front of the cylinder block. Note and record the camshaft end play.
- If the camshaft end play exceeds specifications, install a new
camshaft thrust plate.
Refer to the appropriate section in Group 303 for the procedure.
 Camshaft Journal - Clearance, Plastigage Method
Special Tool(s)
Plastigage
303-D031 (D81L-6002-B) or
equivalent
NOTE: The camshaft journals must meet specifications before checking
camshaft journal clearance.
1. Remove the camsh ...
 Camshaft End Play - OHC Engines
Special Tool(s)
Dial Indicator Gauge with
Holding Fixture
100-002 (TOOL-4201-C) or
equivalent
1. Remove the roller followers. Refer to the appropriate section in Group 303
for the ...
Other materials:
Climate Control System - General Information
General Specifications
a - Manifold gauge set pressures may vary slightly depending on the distance
between the service gauge port valve and the A/C pressure relief valve, the A/C
cycling switch, the pressure cutoff switch
(V6), and the dual function press ...
Anti-Lock Control - Traction Control
Torque Specifications
Anti-Lock Control -Traction Control
The four wheel anti-lock brake system (4WABS) with traction control consists
of the following
components:
anti-lock brake control module (2C346)
front anti-lock brake sensor (2C204)/(2C205)
front ...
Oil Level Indicator and Tube
Removal and Installation
1. Remove the oil level indicator.
2. Remove the LH exhaust manifold. For additional information, refer to Exhaust
Manifold LH in
this section.
3. Remove the bolt.
4. Remove the oil level indicator tube.
5. To install, reverse t ...
