Ford Mustang (1999-2004) Service Manual: Gearshift Rail and Fork
Disassembly and Assembly
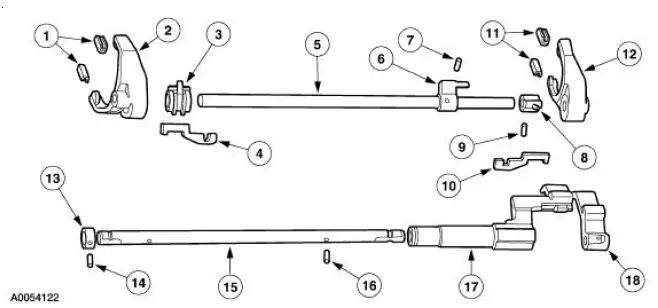
1. Disassemble the first/second and third/fourth shift rail as follows:
- Rotate the interlock plate until it is opposite of the shift links.
- Slide off the third/fourth shift fork and shift link. Separate the link from the fork.
- Slide off the first/second shift fork and shift link. Separate the link from the fork.
- Remove the interlock plate.
- Using a 5/32-inch drift and a hammer, remove and discard the roll pins. Slide the gear select solenoid lever and the selector pin from the shift rail.
2. Disassemble the fifth/sixth and reverse shift rail as follows:
- Using a 5/32-inch drift and a hammer, remove and discard the roll pins. Slide the collar and the reverse shift lever from the shift rail.
- Slide off the fifth/sixth shift lever and shift link.
3. Inspect the shift rail components.
- Check the rails, shift forks, shift levers and shift links for wear or damage. Install new components as necessary.
- Check the shift fork pads for wear. Install new pads as necessary.
4. To assemble, reverse the disassembly procedure.
- Install new roll pins.
 Synchronizers
Disassembly and Assembly
NOTE: This procedure applies to all synchronizer assemblies.
1. NOTE: Synchronizer components are not interchangeable. During
disassembly, mark each
individual synchronizer f ...
 Extension Housing
Special Tool(s)
Installer, Bearing Cup
204-039 (T77F-1217-B)
Adapter for 303-224 (Handle)
205-153 (T80T-4000-W)
Disassembly and Assembly
1. Remove the bolt and ...
Other materials:
Refrigerant System Tests
Special Tool(s)
R-134a Manifold Gauge Set
176-R032A or equivalent
1. Connect the R-134a Manifold Gauge Set. For additional information, refer
to Manifold Gauge
Set Connection in this section.
2. Adjust the climate controls for maximum cooling ...
Seal
Special Tool(s)
Installer, Transmission
Extension Housing Oil Seal
308-227 (T94P-7657-A)
Slide Hammer
100-001 (T50T-100-A)
Remover, Bushing
307-001 (TOOL-1175-AC) or
Equivalent
Removal
1. With the vehicle in NEU ...
Instrument Cluster Replacement
When it is necessary to install a new instrument cluster, contact the
Instrument Cluster Program.
Gauge Indication Systems
Tachometer
Engine rpm information is relayed to the instrument cluster from the
powertrain control module (PCM)
over the standard ...
