Ford Mustang (1999-2004) Service Manual: Heater Hose Coupling
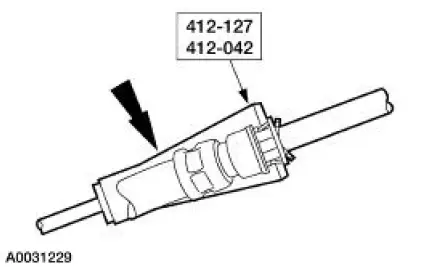
Special Tool(s)
 |
Remover, Heater Hose Inlet Tube 412-042 (T85T-18539-AH) |
 |
Disconnect Tool, Heater Hose 412-127 |
Material
| Item | Specification |
| MERPOL - | ESE-M99B144-B |
Disconnect
CAUTION: Do not attempt to install a new bushing, spacer or O-rings in the heater hose coupling; damage to the heater hose coupling can result. If the heater hose coupling is the cause of a coolant leak, the affected heater hose must be replaced as an assembly.
1. WARNING: The engine must be off, fully cool and the cooling system fully depressurized before attempting to disconnect any heater water hoses. Failure to comply with this warning can result in serious injury or burns from hot liquid escaping out of the engine cooling system.
Depressurize the engine cooling system.
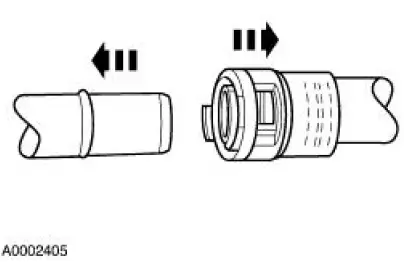
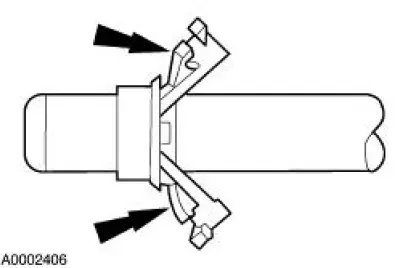
2. Push the heater hose toward the tube to fully expose the locking tabs.
3. NOTE: When compressing the white coupling retainer with the special tool, the special tool must be perpendicular to and on the highest point of the coupling.
NOTE: If the heater hose coupling is accessible, the retainer tabs can be compressed by hand to disconnect the heater hose.
Push the special tool over the coupling retainer windows to compress the retainer locking tabs.
4. NOTE: A slight twisting motion while pulling on the heater water hose may be necessary to assist in the removal.
Pull the heater hose away from the heater core tube.
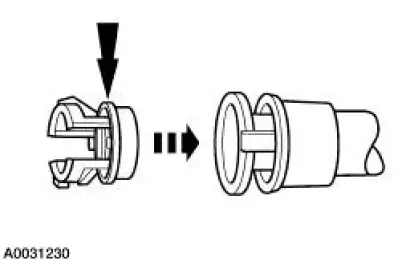
5. Spread the retainer tabs apart and slide the retainer off the tube.
- Discard the retainer.
Connect
1. Clean the tubes and lubricate with coolant hose lubricant or plain water.
2. Install a new coupling retainer (18D434) into the heater hose coupling housing.
3. Push the heater hose coupling onto the tube.
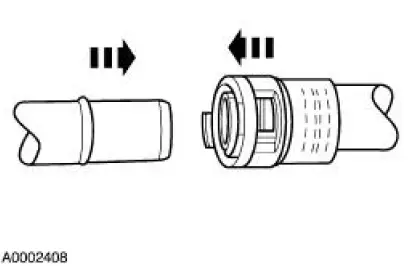
4. Make sure the heater hose coupling is fully engaged by lightly pulling on the heater hose.
 Connect
1. Install the A/C tube lock coupling spring.
2. Lubricate the inside of the coupling with PAG Refrigerant Compressor Oil
(R-134a Systems) or
equivalent.
3. CAUTION: Use only the new O-ring seals ...
 Air Conditioning Line (Peanut) Fitting
Disconnect
1. CAUTION: Support the female fitting with a wrench to prevent the
tubes from
twisting.
Remove the nut from the peanut fitting.
2. Pull the peanut fitting apart.
3. CAUTION: Do not us ...
Other materials:
Camshaft Roller Follower
Special Tool(s)
Compressor, Valve Spring
(Intake)
303-452 (T93P-6565-AR)
Compressor, Valve Spring
(Exhaust)
303-567 (T97P-6565-AH)
Removal
1. Remove the valve cover. For additional information, refer to Valve Cover
LH or Valv ...
Fittings - Vapor Tube
Disconnect
1. WARNING: The evaporative emission system contains fuel vapor and
condensed
fuel vapor. Although not present in large quantities, it still presents the
danger of
explosion or fire. Disconnect the battery ground cable from the battery to
minimiz ...
Exhaust Manifold to Exhaust Gas Recirculation (EGR)
Valve Tube - Cobra
Removal and Installation
1. Remove the EGR valve. For addditional information, refer to Exhaust
Gas Recirculation (EGR)
Valve-Cobra in this section.
2. With the vehicle in NEUTRAL, position it on a hoist.
3. Disconnect the exhaust manifold to EGR valve ...
