Ford Mustang (1999-2004) Service Manual: Inspection and Verification
1. Verify customer concern by running the engine.
2. Inspect the drive belt for chunking, fraying and wear.
3. Check the drive belt for correct routing.
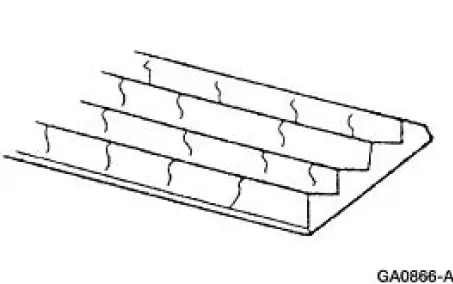
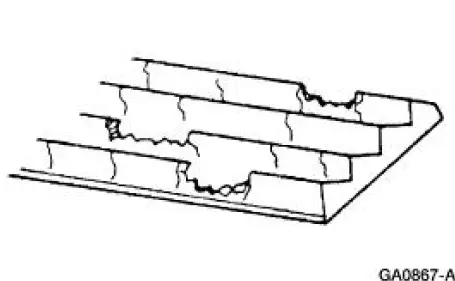
Drive Belt Cracking/Chunking/Wear
V Ribbed Serpentine Drive Belt With Cracks Across Ribs
The accessory drive:
- has a single serpentine drive belt.
- has an automatic drive belt tensioner.
- does not require adjustment.
V Ribbed Belt With Chunks of Rib Missing
Symptom Chart
| Condition | Possible Sources | Action |
|
|
|
|
|
|

 Component Tests
Drive Belt Noise/Flutter
Drive belt chirp occurs due to pulley misalignment or excessive pulley runout.
It can be the result of a
damaged pulley or an incorrectly aligned pulley.
To correct, determi ...
Other materials:
Shock Absorber
Removal
WARNING: All vehicles are equipped with gas pressurized shock absorbers
which will
extend unassisted. Do not apply heat or flame to the shock absorbers during
removal or
component servicing. Failure to follow these instructions can result in personal ...
Valve Spring Strength
Special Tool(s)
Pressure Gauge, Valve/Clutch
Spring
303-006 (TOOL-6513-DD) or
equivalent
1. Use a Valve/Clutch Spring Pressure Gauge to check the valve spring for
correct strength at the
specified valve spring length.
Refer to the appr ...
Removal
NOTE: The convertible top hydraulic components are removed from the vehicle
as an assembly. The
hydraulic components are individually repaired and the system must be bled
before being installed into
the vehicle.
Hydraulic system
1. Unlatch the convertible to ...
