
Ford Mustang (1999-2004) Service Manual: Washer Pump
Removal
1. Remove the LF wheel and tire. Refer to Section.
2. Position the front portion of the LF inner splash shield aside.
3. WARNING: Windshield washer solution contains methanol, which is poisonous.
Observe all cautions and warnings indicated on label of washer solution container.
NOTE: To prevent spilling windshield washer fluid, drain the windshield washer reservoir before removal.
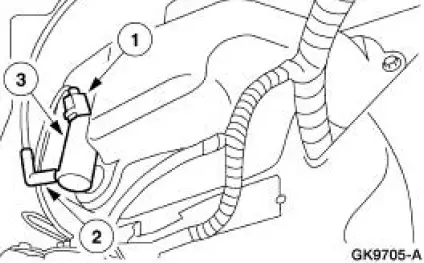
Remove the washer pump.
1. Disconnect the electrical connector.
2. Disconnect washer hose from the washer pump.
3. Remove the washer pump.
Installation
1. WARNING: Windshield washer solution contains methanol, which is poisonous.
Observe all cautions and warnings indicated on label of washer solution container.
CAUTION: Do not operate the windshield washer pump prior to filling the windshield reservoir.
To install, reverse the removal procedure.
- Fill the windshield washer reservoir.
 Motor - Windshield Wiper
Removal
CAUTION: The internal permanent magnets used in the windshield
wiper motor are made
of a glass-like material. To avoid damaging the magnets, do not strike
the motor with a hammer
o ...
 Reservoir
Removal
1. Remove the LF wheel and tire. Refer to Section.
2. Position the front portion of the LF inner splash shield aside.
3. WARNING: Windshield washer solution contains methanol, which is ...
Other materials:
Disassembly
1. Remove the differential assembly from the differential housing. For
additional information, refer
to Differential Case in this section.
2. Remove the bolts.
3. CAUTION: Do not damage the threads in the bolt holes.
Insert a punch in the bolt holes and d ...
Accelerator Cable - Supercharged Engine
Removal and Installation
1. Push the accelerator cable nylon bushing out of the accelerator pedal and
shaft arm.
2. Disconnect the accelerator cable from the throttle cam.
3. Depress the tabs and disconnect the accelerator cable from the bracket.
4. Rel ...
Cleaning the instrument panel and instrument cluster lens
WARNING: Do not use chemical solvents or strong detergents
when cleaning the steering wheel or instrument panel to avoid
contamination of the airbag system.
Clean the instrument panel and cluster lens with a clean, damp, white,
cotton cloth, then use a clean a ...
