Ford Mustang (2005-2014) Owners Manual: Autolamps
WARNING: In severe weather conditions, it may be necessary to switch your headlamps on manually.
Note: If the vehicle is equipped with autolamps, it will have the windshield wiper rainlamp feature. When the windshield wipers are turned to low- or high-speed wiping during daylight, and the headlamp control is in the autolamp position, the exterior lamps will turn on after a brief delay and will remain on until the wipers are turned off.
The autolamp system provides light sensitive automatic on-off control of the exterior lights normally controlled by the headlamp control.
The headlamps will remain on for a period of time after you switch the ignition off. You can adjust the time delay using the display controls in the instrument cluster. See the Information Displays chapter.
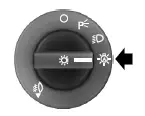
 Lighting control
A. Off
B. Parking lamps, instrument panel
lamps, license plate lamps and tail
lamps
C. Headlamps
High Beams
• Push the lever toward the
instrument panel to switch
on the high beams.
• Pull the l ...
 Instrument lighting dimmer
• Move the control up or down to
adjust the intensity of the panel
lighting.
• Move the control to the full
upright position, past detent,
to turn on the interior lamps.
• Move the control down ...
Other materials:
Installation
LH mount
1. Position the engine mount and install the bolt and studbolts.
2. Attach the ground cables and install the nuts.
RH mount
3. Position the engine mount and install the bolts and studbolt.
4. Attach the wiring harness and install the nut.
Both ...
Ignition Switch Lock Cylinder - Non-Functional
Removal and Installation
1. NOTE: Make sure the front wheels are in the straight-ahead
position.
Disconnect the battery ground cable (14301) and wait at least one minute to
allow the depletion
of the restraint system backup power supply.
2. WARNING: To avo ...
Roadside assistance
Vehicles Sold in the U.S.: Getting Roadside Assistance
To fully assist you should you have a vehicle concern, Ford Motor
Company offers a complimentary roadside assistance program.
This program is separate from the New Vehicle Limited Warranty.
The service i ...
