Ford Mustang (2005-2014) Owners Manual: Instrument lighting dimmer
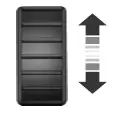
• Move the control up or down to
adjust the intensity of the panel
lighting.
• Move the control to the full
upright position, past detent,
to turn on the interior lamps.
• Move the control down, past
detent, to turn off the interior
lights.
Note: The panel dimmer control works only in nighttime illumination mode. It has no effect in daytime illumination mode. Also, selectable features, such as gauge color and halo color, will not be available in daytime illumination mode.
Note: If the battery is disconnected, discharged, or a new battery is installed, the dimmer switch requires re-calibration. Rotate the dimmer switch from the full dim position to the full dome On position to reset.
This will ensure that your displays are visible under all lighting conditions.
 Autolamps
WARNING: In severe weather conditions, it may be necessary to
switch your headlamps on manually.
Note: If the vehicle is equipped with autolamps, it will have the
windshield wiper rainlamp feature. Wh ...
 Headlamp exit delay
You can set the delay time to keep the headlamps on for up to three
minutes after the ignition is turned off.
Follow the steps below to change the delay time (Steps 1 through 6
must be done within 10 ...
Other materials:
Electronic Engine Controls (Description and Operation)
The electronic engine controls consist of the following:
powertrain control module (PCM)
throttle position (TP) sensor
idle air control (IAC) valve
engine coolant temperature (ECT) sensor
cylinder head temperature sensor
camshaft position ...
Powertrain Control Module (PCM)
Removal
1. Disconnect the battery ground cable. For additional information,
refer to Section.
2. Remove the RH front door scuff plate.
3. Remove the RH cowl side trim panel.
Remove the pin-type retainer.
Remove the panel.
4. Disconnect ...
Installation
1. Install the intake manifold and gaskets, tighten the bolts in the sequence
shown.
2. NOTE: The O-ring is to be installed on the top of the thermostat.
Install the water thermostat and the O-ring.
Install a new O-ring as necessary.
3. Install the wa ...
