Ford Mustang (1999-2004) Service Manual: Fuel Filter
Removal
WARNING: Fuel supply lines on all vehicles equipped with fuel injected engines will remain pressurized for long periods of time after engine shutdown. Fuel system pressure must be relieved prior to fuel system service to prevent possible personal injury or a fire hazard.
1. Disconnect the battery. For additional information, refer to Section.
2. Relieve the fuel system pressure. For additional information, refer to Section .
3. Raise the vehicle. For additional information, refer to Section.
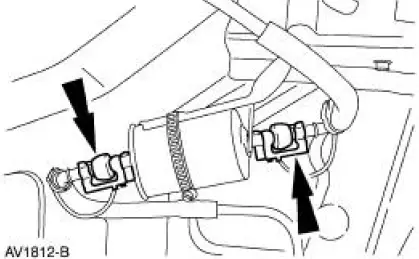
4. Disconnect the filter push connect fittings. For additional information, refer to Section.
5. Unsnap the filter from the bracket and remove.
Installation
1. To install, reverse the removal procedure.
Inertia Fuel Shutoff (IFS) Switch
Removal
1. Disconnect the battery. For additional information, refer to Section.
2. Open the luggage compartment.
3. Remove the inertia fuel shutoff (IFS) switch electrical connector and screws and remove the switch.

Installation
1. To install, reverse the removal procedure.
 Fuel Tank Filler Pipe
Removal
1. Remove the fuel tank. For additional information, refer to Fuel Tank in
this section.
2. Remove the bolts from the filler pipe housing.
3. Remove the bolts from the filler pipe rubber b ...

Other materials:
Degas Bottle
Removal and Installation
1. Drain the coolant. For additional information, refer to Supercharger
Cooling System Draining,
Filling and Bleeding in this section.
2. Disconnect the coolant hoses.
3. Remove the bolts and the degas bottle.
4. To install ...
Safety Belts
PRINCIPLES OF OPERATION
WARNING: Always drive and ride with your seat back upright
and the lap belt snug and low across the hips
WARNING: To reduce the risk of injury, make sure children sit
where they can be properly restrained.
WARNING: Never let a passenger ...
General operating tips
Manual Climate Control
• To reduce fog build-up on the windshield during humid weather, select
Defrost. You can also improve clearing by increasing the temperature
and fan speed.
• To reduce humidity build-up inside the vehicle, do not drive with the
syste ...
