
Ford Mustang (2005-2014) Owners Manual: Fuse specification chart
Power Distribution Box
WARNING: Always disconnect the battery before servicing high current fuses.
WARNING: To reduce risk of electrical shock, always replace the cover to the power distribution box before reconnecting the battery or refilling fluid reservoirs.
The power distribution box is located in the engine compartment. It has high-current fuses that protect your vehicle’s main electrical systems from overloads.
If the battery has been disconnected and reconnected, see Changing the Vehicle Battery in the Maintenance chapter.
The high-current fuses are coded as follows:
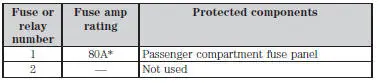
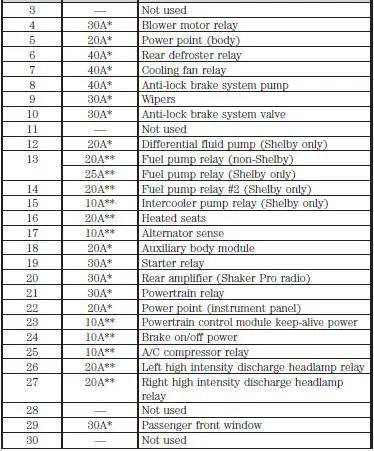
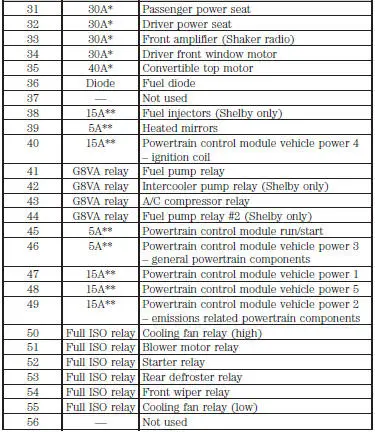

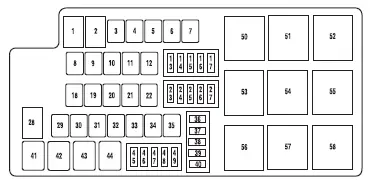
Passenger Compartment Fuse Panel
The fuse panel is located in the lower passenger side area behind the kick panel. Open the trim panel door and remove the fuse cover to access the fuses.
Use the provided fuse puller tool to remove a fuse. It is located inside the fuse cover.
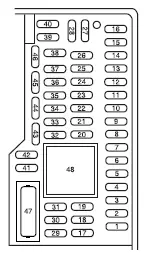
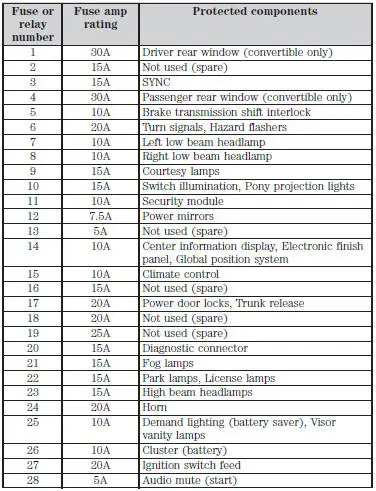
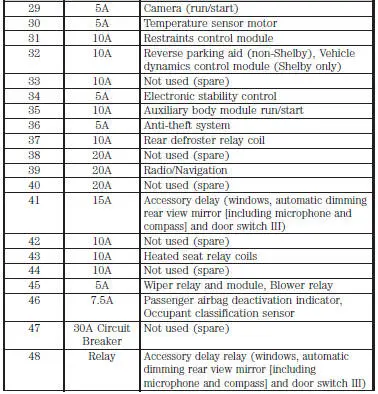
The fuses are coded as follows:
Auxiliary Relay with Heated Seats (If Equipped)
Vehicles equipped with heated seats have a relay box located under the driver seat. This box contains two relays for the driver and passenger heated seats.
 Changing a fuse
Fuses
WARNING: Always replace a fuse with one that has the
specified amperage rating. Using a fuse with a higher amperage
rating can cause severe wire damage and could start a fire.
If electrical com ...
 Maintenance
...
Other materials:
Lumbar Control Switch
Removal and Installation
All vehicles
1. Remove the front seat. For additional information, refer to Seat-Front
Power in this section.
Vehicles with standard power lumbar
2. Pull to remove the lumbar control switch (14C715).
3. Disconnect the power lum ...
Hydraulic System
Fluid Pump
The transmission uses a gerotor-type design front pump support and gear. The
pump provides the
volume of fluid needed to charge the torque converter, main control assembly,
cooling system and
lube system. Pump pressure is regu ...
Safety Belt Maintenance
WARNING: All safety belt assemblies include retractors, buckles, front
seat belt buckle
support assemblies (slide bar, if so equipped), shoulder belt height adjuster
(if equipped), child
safety seat tether bracket assemblies (if equipped) and attaching hardw ...
