Ford Mustang (1999-2004) Service Manual: Caliper
1. NOTE: It is not necessary to do a complete brake system bleed if only the disc brake caliper (2B120) was disconnected.
Place a box end wrench on the disc brake caliper bleeder screw (2208). Attach a rubber drain tube to the disc brake caliper bleeder screw, and submerge the free end of the tube in a container partially filled with clean brake fluid.
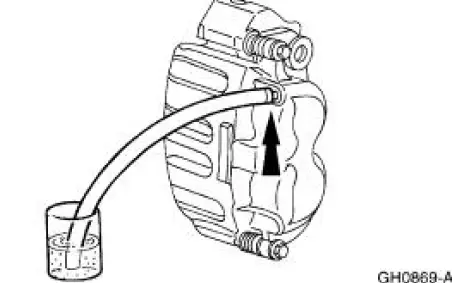
2. Have an assistant pump the brake pedal (BP) (2455) and then hold firm pressure on the brake pedal.
3. Loosen the disc brake caliper bleeder screw until a stream of brake fluid comes out. While the assistant maintains pressure on the brake pedal, tighten the disc brake caliper bleeder screw.
- Repeat until clear, bubble-free fluid comes out.
- Refill the brake master cylinder reservoir (2K478) as necessary.
4. Tighten the disc brake caliper bleeder screw. Refer to Specifications.
 Four Wheel Anti-Lock Brake System (4WABS) Hydraulic Control Unit (HCU)
NOTE: This procedure only needs to be performed if the 4-wheel
anti-lock brake (4WABS) hydraulic
control unit (HCU) has been installed new or if the HCU lines have been
opened.
1. Clean all ...

Other materials:
Electronic Vibration Analyzer (EVA)
The EVA is a hand-held electronic diagnostic tool which will assist in
locating the source of
unacceptable vibrations. The vibration sensor can be remotely mounted anywhere
in the vehicle for
testing purposes. The unit displays the three most common vibratio ...
Installation
All vehicles
1. Position the engine front cover gasket on the engine front cover.
2. NOTE: If the engine front cover is not secured within four minutes, the
sealant must be removed
and the sealing area cleaned with metal surface cleaner. Allow to dry until ...
Suction Accumulator
NOTE: Installation of a new suction accumulator is not required when
repairing the air conditioning
system except when there is physical evidence of contamination from a failed A/C
compressor or
damage to the suction accumulator.
In addition to th ...
