Ford Mustang (2005-2014) Owners Manual: Electronic compass
The compass heading displays in the center-integrated display.
Note: Driving near large buildings, bridges, power lines and powerful broadcast antenna may affect the compass reading. Magnetic or metallic objects placed in, on or near your vehicle may also affect compass accuracy.
Usually, when something affects the compass readings, the compass corrects itself after a few days of operating your vehicle in normal conditions. If the compass still appears to be inaccurate, a manual calibration may be necessary. See Compass calibration adjustment.
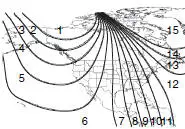
Compass Zone Adjustment
When something affects the compass readings, typically the compass corrects itself after a few days of operating your vehicle in normal conditions. If the compass still appears to be inaccurate, a manual calibration may be necessary.

1. Determine which magnetic zone
you are in for your geographic
location by referring to the zone
map.
2. Turn ignition to the on position.
3. Press and hold the 7 and 9 radio
preset buttons together for
approximately five seconds
until ZONE XX appears.
4. Press and release the 7 and 9 radio preset buttons together, repeatedly
until ZONE XX changes to the correct zone (1–15).
5. The direction displays, and the zone updates, when you release the
buttons.
Compass Calibration Adjustment
Most geographic areas (zones) have a magnetic north compass point that varies slightly from the northerly direction on maps. This variation is four degrees between adjacent zones and becomes noticeable as your vehicle crosses multiple zones. A correct zone setting eliminates this error.
Perform compass calibration in an open area free from steel structures and high voltage lines. For optimum calibration, turn off all electrical accessories (such as the heater, air conditioning or wipers) and make sure no vehicle doors are open.
1. Start your vehicle.
2. Press and hold the 7 and 9 radio preset buttons together for
approximately 10 seconds until CAL appears. Release the buttons.
3. Drive your vehicle in a circle slowly (under than 3 mph [5 km/h]);
it may take up to five circles to complete calibration.
4. Calibration is complete when the CAL display changes to the
direction value (such as N, S, E or W).
 Information messages
Note: Depending on the vehicle options equipped with your vehicle, not
all of the messages will display or be available. Certain messages may be
abbreviated or shortened depending upon which cluster t ...
 Climate Control
...
Other materials:
Pinpoint Test L: B1892 - Air Bag Tone Warning Indicator Circuit Shorted to
Ground or Open
Normal Operation
The restraints control module (RCM) monitors its connection to the
generic electronic module (GEM) at
C201e pin 10. This connection is used to signal a chime if the air bag
indicator is inoperative and
another SRS fault exists. If the R ...
Warning lamps and indicators
These indicators can alert you to a vehicle condition that may become
serious enough to cause expensive repairs. Many lights will illuminate
when you start your vehicle to make sure they work. If any light remains
on after starting the vehicle, refer to the re ...
Shield
Removal
1. Remove the brake disc (1125). For additional information, refer to
Disc in this section.
2. Remove the brake disc shield (2K004).
1. Drill out three brake disc shield rivets.
2. Remove the brake disc shield.
Installation
1. I ...
