Ford Mustang (1999-2004) Service Manual: Generator - 4.6L 2V
Removal and Installation
1. Disconnect the battery (10655). For additional information, refer to Section.
2. Relieve the accessory drive belt (8620) tension and remove the belt from the generator pulley.
Leave the belt in place for reinstallation. For additional information, refer to Section.
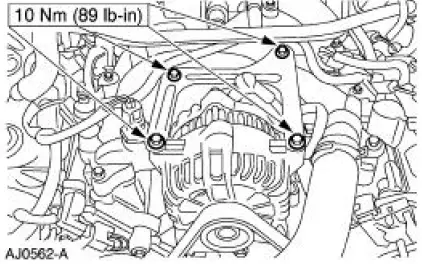
3. Remove the bolts on the upper generator bracket and remove the bracket.
4. CAUTION: This is a new style connector that has a press-to-release tab. Pulling on the tab could result in damage to the connector or harness.
Disconnect the generator electrical connections.
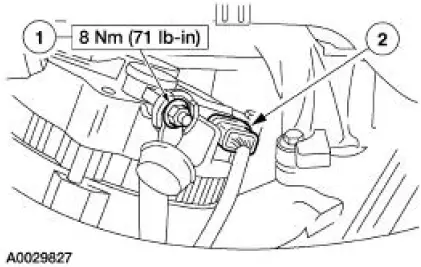
1. Remove the battery positive cable nut (1) and cable.
2. Disconnect the generator electrical connector.
5. Remove the lower generator bolts and remove the generator.
6. To install, reverse the removal procedure.
 Generator - 3.8L
Removal and Installation
1. Disconnect the battery (10655). For additional information, refer
to Section.
2. Relieve the accessory drive belt (8620) tension and remove the belt
from the gen ...
 Generator - 4.6L 4V
Removal and Installation
1. Disconnect the battery. For additional information, refer to
Section.
2. Relieve the accessory drive belt tension and remove the belt from the
generator pulley.
...
Other materials:
Refueling
WARNING: Fuel vapor burns violently and a fuel fire can cause
severe injuries. To help avoid injuries to you and others:
• Read and follow all the instructions on the pump island.
• Turn off your engine when you are refueling.
• Do not smoke if you are n ...
Installation
1. CAUTION: Do not use metal scrapers, wire brushes, power abrasive
discs or other
abrasive means to clean the sealing surfaces. These tools cause scratches and
gouges
which make leak paths. Use a plastic scraping tool to remove all traces of old
sealant.
...
Connecting Rod - Bearing Journal Clearance
Special Tool(s)
Plastigage
303-D031 (D81L-6002-B) or
equivalent
NOTE: The crankshaft connecting rod journals must be within
specifications to check the connecting
rod bearing journal clearance.
1. Remove the connecting rod bearing cap.
2. ...
