
Ford Mustang (1999-2004) Service Manual: Inspection and Verification
WARNING: Batteries contain sulfuric acid. Avoid contact with skin, eyes, or clothing.
Also, shield your eyes when working near batteries to protect against possible splashing of the acid solution. In case of acid contact with skin or eyes, flush immediately with water for a minimum of 15 minutes and get prompt medical attention. If acid is swallowed, call a physician immediately.
WARNING: Batteries normally produce explosive gases which can cause personal injury.
Therefore, do not allow flames, sparks or lighted substances to come near the battery. When charging or working near a battery, always shield your face and protect your eyes. Always provide ventilation.
WARNING: When lifting a plastic-cased battery, excessive pressure on the end walls could cause acid to spew through the vent caps resulting in personal injury, damage to the vehicle or to the battery. Lift with a battery carrier or with your hands on opposite corners.
1. Verify the customer concern by operating the engine to duplicate the concern.
2. Inspect the charging system (battery, generator cable, harness connectors, connections) to determine if any obvious mechanical or electrical concerns exist. If found, repair as necessary and test the system for normal operation. Refer to the following tables:
Visual Inspection Chart
| Mechanical | Electrical |
|
|
3. Check the operation of the charging system warning indicator lamp (instrument cluster). Normal operation is as follows:
- With the ignition switch OFF, the charging system warning indicator should be OFF.
- With the ignition switch in RUN and the engine off, the charging system warning indicator light should be on.
- With the engine running, the charging system warning indicator light should be off.
4. Verify the battery is being charged. Carry out the Battery-Load Test. Refer to Component Tests in this section.
Normal Charging System Voltages
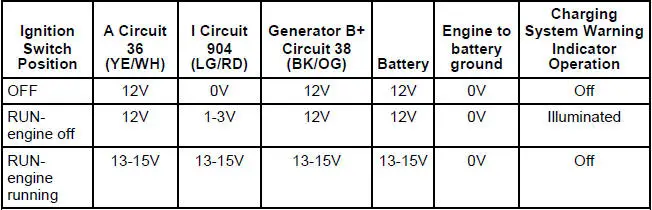
5. If the customer concern is verified after the initial inspection, refer to the Symptom Chart to determine which tests to carry out.
Symptom Chart
| Condition | Possible Sources | Action |
|
|
|
|
|
|
|
|
|
|
|
|
|
|
|
|
|
|
|
|
|
|
|
|
 Functionality
With the ignition switch in the RUN position, voltage is applied
through the warning indicator I circuit
904 (LG/RD) to the voltage regulator. This turns the regulator on,
allowing current to ...
 Pinpoint Tests
CAUTION: Do not make jumper connections except as directed.
Incorrect connections
may damage the voltage regulator test terminals, fuses, or fuse links.
CAUTION: Do not allow any metal object ...
Other materials:
Security Access - Procedure
Special Tool(s)
Worldwide
418-F224,
New Generation STAR (NGS)
Tester
418-F052, or equivalent
diagnostic tool
NOTE: The security access procedure is utilized to obtain passive anti-theft
system (PATS) security
access. PATS security acce ...
Relay Switch
1. Disconnect the battery ground cable. For additional information, refer
to Section.
2. Remove the power distribution box cover.
3. Remove the starter relay from the power distribution box.
Installation
1. To install, reverse the removal procedure. ...
Speed Control (Diagnosis and Testing)
Refer to Wiring Diagrams Cell 31 , Speed Control for schematic and connector
information.
Special Tool(s)
Worldwide Diagnostic System
(WDS)
418-F224,
New Generation STAR (NGS)
Tester
418-F052, or equivalent
diagnostic tool
7 ...
