Ford Mustang (2005-2014) Owners Manual: Navigation controls
Type 1
WARNING: Driving while distracted can result in loss of vehicle control, crash and injury. We strongly recommend that you use extreme caution when using any device that may take your focus off the road. Your primary responsibility is the safe operation of your vehicle. We recommend against the use of any hand-held device while driving and encourage the use of voice-operated systems when possible.
Make sure you are aware of all applicable local laws that may affect the use of electronic devices while driving.
The system divides the screen in two sections after it initializes:
• Status bars: This is the top and bottom portion of the screen.
It displays the clock or date and other useful information, depending
on which mode you are in.
• Display area: The touchscreen changes depending on current
system operation. Different buttons display in this area, depending
on which mode you are in.
Note: Some features, such as Sirius satellite radio, may not be available in your location. Check with an authorized dealer.
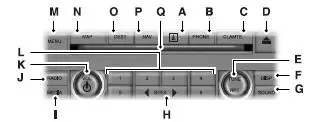
A. I (Information): Press this button to access features such as Where am I?, Sirius Travel Link, Calendar, System Info and Help.
B. PHONE: Press this button to access the SYNC phone menu.
C. CLIMATE: Press this button to access the climate control menu.
D. Eject: Press this button to eject a CD or DVD from the system.
E. TUNE RPT:
• In radio or satellite radio mode, turn the control to advance in
individual increments up or down the frequency band to the desired
station.
• In MP3 mode, turn the control to advance to the next or previous
folder.
• In navigation mode, press this button to hear the last spoken
navigation guidance prompt.
F. DISP: Press this button to select a display mode: On, Status Bar Only, and Off.
G. SOUND:
• Press this button to access the sound menu.
• Press while the sound menu is active to access the menu tabs of
Bass/Treble, Balance/Fade, SCV (Speed Compensated Volume), DSP
(Digital Signal Processing) and Visualizer.
H. SEEK:
• In radio and satellite radio mode, press the arrow buttons to find
previous or next available stations or channels within the currently
selected Category or Genre.
• In CD and DVD modes, press the arrow buttons to select the previous
or next track or chapter.
I. MEDIA:
• Press this button to access the media menu.
• Press while the media menu is active to access the available sources
of CD/DVD, Jukebox and User Device.
J. RADIO:
• Press this button to access the radio menu.
• Press while the radio menu is active to access the available sources of
AM, FM1, FM2, SAT1, SAT2, and SAT3.
K. VOL: Press and hold this button to turn the system off and on. Turn the control to adjust the volume.
Note: If a navigation route is active when the navigation system is off, the system resumes the route when you turn the system on.
L. Memory presets:
• Store your favorite radio stations. To store a radio station, tune to the
station, then press and hold a preset button until sound returns.
• In radio and satellite radio mode, press a button to access your saved
presets or channels.
M. MENU:
• Press this button to access the system menu.
• Press while the system menu is active to access the menu tabs of
Display, Clock, Feedback Settings, System Settings and Valet Mode.
N. MAP:
• Press this button to access the navigation map.
• Press while the map display is active to center the map on the
current vehicle position. Press while the map display and route are
active to see the different map guidance views.
O. DEST:
• Press this button to access the destination entry menu.
• Press while the destination entry menu is active to show additional destination entry techniques.
P. NAV:
• Press this button to access the navigation menu.
• Press while the navigation menu is active to access the navigation
menu tabs.
Q. CD and DVD slot: Insert a CD or DVD, label side up.
Type 2
WARNING: Driving while distracted can result in loss of vehicle control, crash and injury. We strongly recommend that you use extreme caution when using any device that may take your focus off the road. Your primary responsibility is the safe operation of your vehicle. We recommend against the use of any hand-held device while driving and encourage the use of voice-operated systems when possible.
Make sure you are aware of all applicable local laws that may affect the use of electronic devices while driving.
The system divides the screen in two sections after it initializes:
• Status bars: This is the top and bottom portion of the screen.
It displays the clock or date and other useful information, depending
on which mode you are in.
• Display area: The touchscreen changes depending on current
system operation. Different buttons display in this area, depending on
which mode you are in.
Note: Some features, such as Sirius satellite radio, may not be available in your location. Check with an authorized dealer.
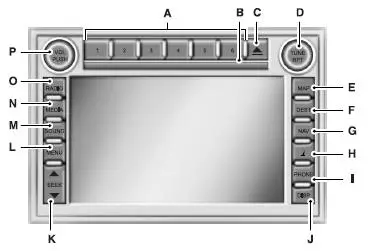
A. Memory presets:
• Store your favorite radio stations. To store a radio station, tune to the
station, then press and hold a preset button until sound returns.
• In radio and satellite radio mode, press a button to access your saved
presets or channels.
B. CD and DVD slot: Insert a CD or DVD, label side up.
C. Eject: Press this button to eject a CD or DVD from the system.
D. TUNE RPT:
• In radio or satellite radio mode, turn the control to advance in
individual increments up or down the frequency band to the desired
station.
• In MP3 mode, turn the control to advance to the next or previous
folder.
• In navigation mode, press this button to hear the last spoken
navigation guidance prompt.
E. MAP:
• Press this button to access the navigation map.
• Press while the map display is active to center the map on the
current vehicle position. Press while the map display and route are
active to see the different map guidance views.
F. DEST:
• Press this button to access the destination entry menu.
• Press while the destination entry menu is active to show additional
destination entry techniques.
G. NAV:
• Press this button to access the navigation menu.
• Press while the navigation menu is active to access the navigation
menu tabs.
H. I (Information): Press this button to access features such as Where am I?, Sirius Travel Link, Calendar, System Info and Help.
I. PHONE: Press this button to access the SYNC phone menu.
J. DISP: Press this button to select a display mode: On, Status Bar Only, and Off.
K. SEEK:
• In radio and satellite radio mode, press the arrow buttons to find
previous or next available stations or channels within the currently
selected Category or Genre.
• In CD and DVD modes, press the arrow buttons to select the previous
or next track or chapter.
L. MENU:
• Press this button to access the system menu.
• Press while the system menu is active to access the menu tabs of
Display, Clock, Feedback Settings, System Settings and Valet Mode.
M. SOUND:
• Press this button to access the sound menu.
• Press while the sound menu is active to access the menu tabs of
Bass/Treble, Balance/Fade, SCV (Speed Compensated Volume), DSP
(Digital Signal Processing) and Visualizer.
N. MEDIA:
• Press this button to access the media menu.
• Press while the media menu is active to access the available sources
of CD/DVD, Jukebox and User Device.
O. RADIO:
• Press this button to access the radio menu.
• Press while the radio menu is active to access the available sources of
AM, FM1, FM2, SAT1, SAT2, and SAT3.
P. VOL: Press and hold this button to turn the system off and on. Turn the control to adjust the volume.
Note: If a navigation route is active when the navigation system is off, the system resumes the route when you turn the system on.

 Display mode
You can choose to turn your screen on or off and if you would like to
view the status bars on the top and bottom of the screen. Press DISP to
see the options.
Display Mode Voice Commands
The followin ...
Other materials:
Pinpoint Test O: DTC B1870 - Air Bag Indicator Shorted to Battery
Normal Operation
The air bag indicator is designed to illuminate for 6 (+/-2) seconds
when the ignition switch is turned to
the RUN position. This initial 6 seconds of illumination is considered
normal operation and is called
proveout of the air ba ...
Installation
WARNING: To reduce the risk of serious personal injury, read
and follow all warnings,
cautions and notes at the beginning of the removal procedure.
1. Disconnect the battery ground cable and wait at least one minute. For
additional information,
re ...
Fuel Pressure Sensor
Material
Item
Specification
Super Premium SAE 5W-20
Motor Oil
XO-5W20-DSP or equivalent
WSS-M2C914-
A
Removal
WARNING: Do not smoke or carry lighted tobacco or open flame of
any type when
working on or near any fuel related compo ...
