Ford Mustang (1999-2004) Service Manual: Spark Plug Wire
Special Tool(s)
 |
Remover, Spark Plug Wire 303-106 (T74P-6666A) |
Material
| Item | Specification |
| Silicone Brake Caliper Grease and Dielectric Compound D7AZ-19A331-A or equivalent | ESE-M1C171- A |
Removal and Installation
CAUTION: It is important to twist the spark plug wire boots while pulling upward to avoid possible damage to the spark plug wire.
CAUTION: Spark plug wires must be connected to the correct ignition coil terminal. Mark spark plug wire (12286) locations before removing them.
1. Using the special tool, remove the spark plug wire from the spark plug using a twisting motion.
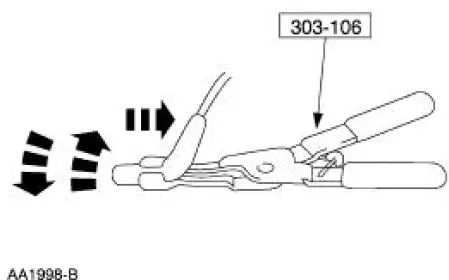
2. Twist while pulling upward to disconnect the spark plug wires from the ignition coil (12029).
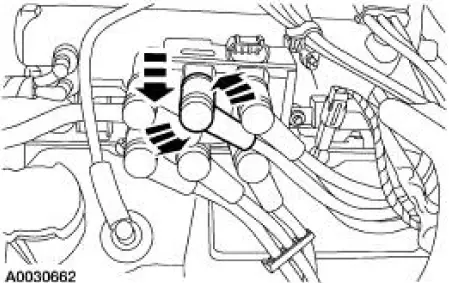
3. CAUTION: Be sure to orient the spark plug boots so the spark plug wires do not contact the exhaust manifold.
NOTE: Apply silicone brake caliper grease and dielectric compound to the inside of spark plug and ignition coil boots of the spark plug wire.
To install, reverse the removal procedure.
 Ignition Coil
Material
Item
Specification
Silicone Brake Caliper Grease
and Dielectric Compound
D7AZ-19A331-A or equivalent
ESE-M1C171-
A
Removal and Installation
1. Disconnect the battery ...
 Spark Plugs
Special Tool(s)
Remover, Spark Plug Wire
303-106 (T74P-6666A)
Material
Item
Specification
Silicone Brake Caliper Grease
and Dielectric Compound
D7AZ-19A331-A or equiva ...
Other materials:
Leakage Inspection
CAUTION: Do not try to stop the fluid leak by increasing the torque
beyond specifications.
This may cause damage to the case threads.
Check the fluid filler tube connection at the transmission case. If
leakage is found here, install a new
grommet.
Ch ...
Pinpoint Test J: LFC 34/DTC B1934 - Driver Air Bag Circuit Resistance Low
Normal Operation
The restraints control module (RCM) monitors the resistance of the driver
air bag ignitor by measuring
the resistance between pins 3 and 4. If the RCM detects low resistance
between these pins, it will
store a diagnostic trouble code (D ...
Headlamp Adjustment
Headlamp Aiming
1. The headlamp aiming procedure depends on the type of beam pattern the
headlamp is
equipped with. Vehicles may come equipped with visual optical right (VOR),
visual optical left
(VOL), or SAE only (includes sealed beam type) headlamps. ...
