Ford Mustang (1999-2004) Service Manual: Suction Accumulator to Compressor Line - 4.6L
Material
| Item | Specification |
| PAG Refrigerant Compressor Oil (R-134a Systems) F7AZ-19589-DA (Motorcraft YN- 12-C) | WSH-M1C231- B |
Removal and Installation
NOTE: Installation of a new suction accumulator is not required when repairing the air conditioning system except when there is physical evidence of contamination from a failed A/C compressor or damage to the suction accumulator.
1. Recover the refrigerant. For additional information, refer to Section.
2. Remove the air cleaner outlet tube. For additional information, refer to Section.
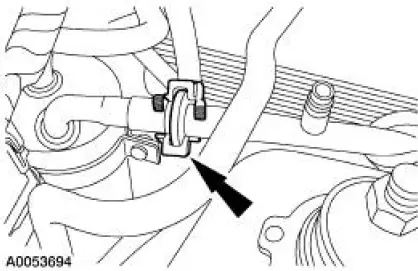
3. Disconnect the spring lock coupling at the suction accumulator.
- Discard the O-ring seals.
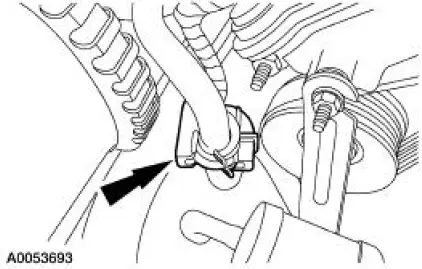
4. Disconnect the spring lock coupling at the compressor manifold.
- Discard the O-ring seals.
5. Remove the suction accumulator to compressor line.
6. To install, reverse the removal procedure.
- Install new O-ring seals lubricated in clean PAG oil.
- Lubricate the refrigerant system with the correct amount of clean PAG oil. For additional information, refer to Section.
7. Evacuate, leak test and charge the refrigerant system. For additional information, refer to Section.
 Compressor Manifold and Tube Assembly - 4.6L
Material
Item
Specification
PAG Refrigerant Compressor
Oil (R-134a Systems)
F7AZ-19589-DA (Motorcraft YN-
12-C)
WSH-M1C231-
B
Removal and Installation
NOTE: Installation of a ...
 Compressor to Condenser Discharge Line - 4.6L
Material
Item
Specification
PAG Refrigerant Compressor
Oil (R-134a Systems)
F7AZ-19589-DA (Motorcraft YN-
12-C)
WSH-M1C231-
B
Removal and Installation
NOTE: Installation of a ...
Other materials:
Suction Accumulator to Compressor Line - 4.6L
Material
Item
Specification
PAG Refrigerant Compressor
Oil (R-134a Systems)
F7AZ-19589-DA (Motorcraft YN-
12-C)
WSH-M1C231-
B
Removal and Installation
NOTE: Installation of a new suction accumulator is not required when
repairing the ...
Installation
All vehicles
1. Position the engine front cover gasket on the engine front cover.
2. NOTE: If the engine front cover is not secured within four minutes, the
sealant must be removed
and the sealing area cleaned with metal surface cleaner. Allow to dry until ...
Lamp Assembly - Headlamp
Removal
1. NOTE: Make sure that the headlamp switch and the ignition switch are
in the OFF position.
Raise the headlamp retainers.
2. Remove the headlamp assembly.
Disconnect the electrical connectors and replace the lamp if
necessary.
Instal ...
