Ford Mustang (1999-2004) Service Manual: Thermostat - 4.6L(4V)
Material
| Item | Specification |
| Motorcraft Premium Gold Engine Coolant VC-7-A (in Oregon VC-7-B) (yellow color) | WSS-M97B51- A1 |
Removal and Installation
1. With the vehicle in neutral, position it on a hoist. For additional information, refer to Section.
2. Drain the engine coolant. For additional information, refer to Cooling System Draining, Filling and Bleeding in this section.
3. Remove the thermostat housing bolts.
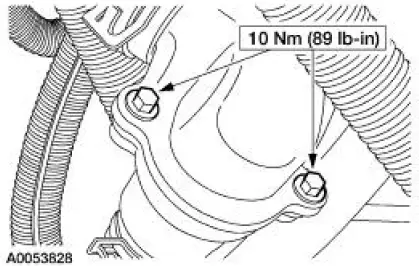
4. Remove the coolant thermostat.
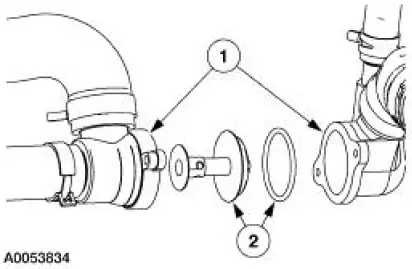
1. Separate the thermostat housing.
2. Remove the coolant thermostat and the O-ring seal.
- Inspect the O-ring seal. Install a new seal, if necessary.
5. NOTE: The thermostat is indexed and must be returned to the original location.
NOTE: Make sure the new O-ring seal is secure around the thermostat.
To install, reverse the removal procedure.
6. Fill the cooling system. For additional information, refer to Cooling System Draining, Filling and Bleeding in this section.
 Thermostat - 4.6L(2V)
Material
Item
Specification
Motorcraft Premium Gold
Engine Coolant
VC-7-A (in Oregon VC-7-B)
(yellow color)
WSS-M97B51-
A1
Removal and Installation
1. Drain the engine coola ...
 Bypass Tube - 3.8L
Material
Item
Specification
Motorcraft Premium Gold
Engine Coolant
VC-7-A (in Oregon VC-7-B)
(yellow color)
WSS-M97B51-
A1
Removal and Installation
1. Drain the engine coola ...
Other materials:
Heating and Defrosting
The heating and defrosting system has the following features:
Controls the temperature and, during A/C operation, reduces the relative
humidity of the air
inside the vehicle.
Delivers heated or cooled air to maintain the vehicle interior
temperature an ...
Wheel Studs
Removal
1. Remove the wheel hub (1104). For additional information, refer to Wheel
Hub and Bearing in
this section.
2. Using a press, remove the wheel stud (1107) from the wheel hub.
Installation
1. Using a press, install a new wheel stud.
2. Install the w ...
Vibration When Brakes are Applied
For vibration concerns when brakes are applied, perform the following
procedure.
Visually inspect:
tire condition and pressure.
suspension bushings and ball joints.
Correct as necessary.
1. Verify and isolate the concern. Brake roughness can be felt in: ...
