Ford Mustang (1999-2004) Service Manual: Battery Tray
Removal and Installation
WARNING: Batteries normally produce explosive gases which can cause personal injury.
Therefore, do not allow flames, sparks or lighted substances to come near the battery. When charging or working near a battery, always shield your face and protect your eyes. Always provide ventilation. Failure to follow these instructions may result in personal injury.
WARNING: Keep out of the reach of children. Batteries contain sulfuric acid. Avoid contact with skin, eyes, or clothing. Also, shield your eyes when working near the battery to protect against possible splashing of the acid solution. In case of acid contact with skin or eyes, flush immediately with water for a minimum of 15 minutes and get prompt medical attention. If acid is swallowed, call a physician immediately. Failure to follow these instructions may result in personal injury.
1. Remove the battery. For additional information, refer to Battery in this section.
2. Remove the battery tray bolts and washers.
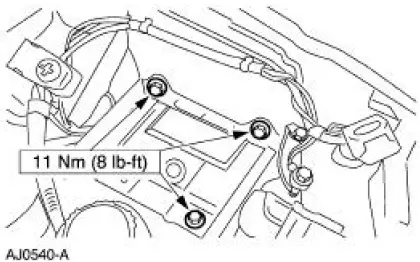
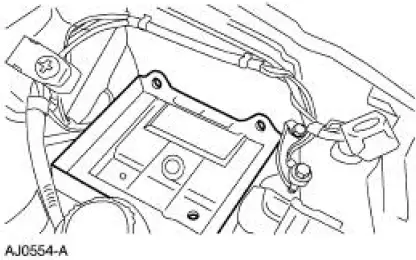
3. Remove the battery tray.
4. NOTE: When the battery is disconnected and reconnected, some abnormal drive symptoms may occur while the vehicle relearns its adaptive strategy. The vehicle needs to be driven to relearn the strategy.
To install, reverse the removal procedure.
 Battery (Removal and Installation)
Removal and Installation
WARNING: Batteries normally produce explosive gases which can
cause personal injury.
Therefore, do not allow flames, sparks or lighted substances to come
near the b ...
 Battery Cables
Removal
WARNING: Batteries normally produce explosive gases which can
cause personal injury.
Therefore, do not allow flames, sparks or lighted substances to come
near the battery. When
ch ...
Other materials:
Principles of Operation
There are four main principles involved with the basic theory of
operation:
heat transfer
latent heat of vaporization
relative humidity
effects of pressure
Heat Transfer
If two substances of different temperature are placed near each other,
t ...
Pinpoint Test C: LFC 29/DTC C1414 - Incorrect Vehicle Identification Code
Normal Operation
The restraints control module (RCM) monitors the electrical state of pins
10, 13 and 14 to determine if
it is installed on the correct vehicle. If the RCM detects an incorrect
condition on any of these pins, it
will store a diagnostic t ...
Exhaust Gas Recirculation (EGR) Valve - Mach I
Removal and Installation
1. Remove the air intake scoop. For additional information, refer to
Section.
2. Remove the exhaust gas recirculation (EGR) valve.
1. Disconnect the EGR tube upper fitting.
2. Disconnect the vacuum hose.
3. Remove the tw ...
