Ford Mustang (1999-2004) Service Manual: Electronic Vibration Analyzer (EVA)
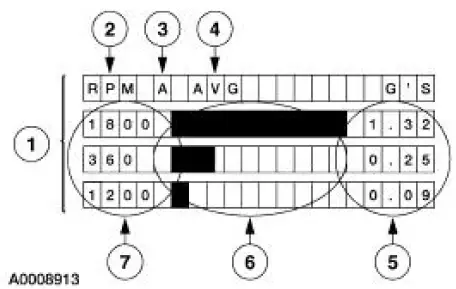
The EVA is a hand-held electronic diagnostic tool which will assist in locating the source of unacceptable vibrations. The vibration sensor can be remotely mounted anywhere in the vehicle for testing purposes. The unit displays the three most common vibration frequencies and their corresponding amplitudes simultaneously. A bar graph provides a visual reference of the relative signal strength (amplitude) of each vibration being displayed and its relative G force. The keypad is arranged to make the EVA simple to program and use. Some of the functions include the ability to average readings as well as record, play back and freeze readings. The EVA has a strobe balancing function that can be used to detect imbalance on rotating components such as a driveshaft or engine accessories.
| Item | Description |
| 1 | EVA screen |
| 2 | Frequency mode displayed in rpm or Hz |
| 3 | Active sensor input (A or B) |
| 4 | Current active mode |
| 5 | G force indicators or the strongest frequencies in descending strength of each vibration |
| 6 | Strength of each vibration |
| 7 | Frequency in rpm/Hz of each vibration |
The EVA allows for a systematic collection of information that is necessary to accurately diagnose and repair NVH problems. For the best results, carry out the test as follows:
a. Test drive the vehicle with the vibration sensor inside the vehicle.
b. Place the sensor in the vehicle according to feel.
- If the condition is felt through the steering wheel, the source is most likely in the front of the vehicle.
- A vibration that is felt in the seat or floor only will most likely be found in the driveline, drive axle or rear wheels and tires.
c. Record the readings. Also note when the condition begins, when it reaches maximum intensity, and if it tends to diminish above/below a certain speed.
- Frequencies should be read in the "average" mode.
- Frequencies have a range of plus or minus 2. A reading of 10 Hz can be displayed as an 8 Hz through 12 Hz.
d. Place the vibration sensor on or near the suspect area outside the vehicle.
e. Continue the road test, driving the vehicle at the speed the symptom occurs, and take another reading.
f. Compare the readings.
- A match in frequency indicates the problem component or area.
- An unmatched test could indicate the concern is caused by the engine, torque converter, or engine accessory. Use the EVA in the rpm mode and check if concern is rpm related.
- Example: A vibration is felt in the seat. Place the sensor on the console. Record the readings. Place the vibration sensor on the rear axle. Compare the readings. If the frequencies are the same, the axle is the problem component.
 Noise, Vibration and Harshness (NVH) (Description and Operation)
Noise is any undesirable sound, usually unpleasant in nature. Vibration is
any motion, shaking or
trembling, that can be felt or seen when an object moves back and forth or up
and down. Harshness is ...
 Vibrate Software
Vibrate Software (Rotunda tool number 215-00003) is a diagnostic aid which
will assist in pinpointing
the source of unacceptable vibrations. The engine's crankshaft is the point of
reference for vib ...
Other materials:
Dual Converter H-Pipe - 4.6L (2V and 4V)
Removal
NOTE: The RH and LH catalytic converters are serviced separately.
1. Raise and support the vehicle. For additional information, refer to
Section.
2. CAUTION: When repairing exhaust system or removing the exhaust
components,
disconnect all heated oxy ...
Evaporator Core Housing
Material
Item
Specification
PAG Compressor Oil (R-134a
Systems)
F7AZ-19589-DA (Motorcraft
YN-12-C)
WSH-M1C231-
B
MERPOL
NA
ESE-M99B144-
B
Removal
NOTE: The evaporator core is not separately serviceable, it is
serviced onl ...
Rear Subframe
Removal and Installation
CAUTION: Suspension fasteners are critical parts because they affect
performance of vital
components and systems and their failure can result in major service expense. A
new part with
the same part number must be installed if install ...
