Ford Mustang (1999-2004) Service Manual: Generator - 4.6L 2V
Removal and Installation
1. Disconnect the battery (10655). For additional information, refer to Section.
2. Relieve the accessory drive belt (8620) tension and remove the belt from the generator pulley.
Leave the belt in place for reinstallation. For additional information, refer to Section.
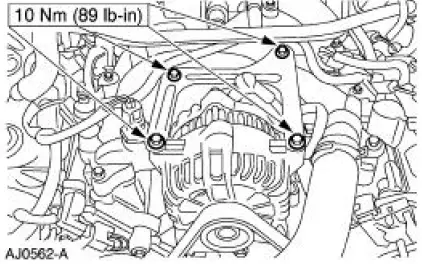
3. Remove the bolts on the upper generator bracket and remove the bracket.
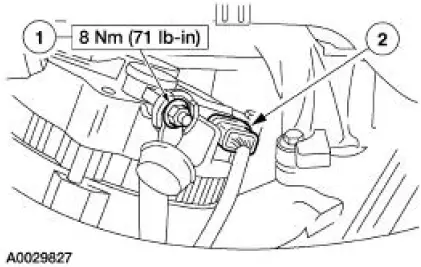
4. CAUTION: This is a new style connector that has a press-to-release tab. Pulling on the tab could result in damage to the connector or harness.
Disconnect the generator electrical connections.
1. Remove the battery positive cable nut (1) and cable.
2. Disconnect the generator electrical connector.
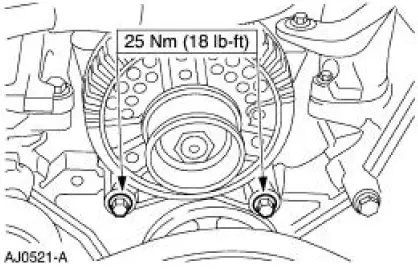
5. Remove the lower generator bolts and remove the generator.
6. To install, reverse the removal procedure.
 Generator - 3.8L
Removal and Installation
1. Disconnect the battery (10655). For additional information, refer
to Section.
2. Relieve the accessory drive belt (8620) tension and remove the belt
from the gen ...
 Generator - 4.6L 4V
Removal and Installation
1. Disconnect the battery. For additional information, refer to
Section.
2. Relieve the accessory drive belt tension and remove the belt from the
generator pulley.
...
Other materials:
Steering Column Switches (Diagnosis and Testing)
Refer to Wiring Diagrams Cell 13 , Power Distribution for schematic and
connector information.
Refer to Wiring Diagrams Cell 81 , Interval Wiper/Washer for schematic and
connector information.
Refer to Wiring Diagrams Cell 85 , Headlamps for schematic and co ...
Cylinder Head (Disassembly and Assembly of Subassemblies)
Special Tool(s)
Compressor, Valve Spring
303-381(T91P-6565-A)
Compressor Spacer, Valve
Spring
303-382 (T91P-6565-AH)
Installer, Valve Stem Oil Seal
303-383 (T91P-6571-A)
Material
Item
Specification
Sup ...
Disc
Removal
1. Remove the front disc brake caliper anchor plate (2B292). For
additional information, refer to
Brake Caliper Anchor Plate in this section.
2. Match mark the hub (1104) and the brake disc (1125).
3. If necessary, remove and discard the kee ...
