Ford Mustang (1999-2004) Service Manual: Generator - 3.8L
Removal and Installation
1. Disconnect the battery (10655). For additional information, refer to Section.
2. Relieve the accessory drive belt (8620) tension and remove the belt from the generator pulley.
Leave the belt in place for reinstallation. For additional information, refer to Section.
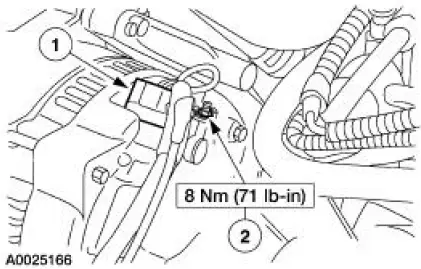
3. CAUTION: This is a new style connector that has a press-to-release tab. Pulling on the tab could result in damage to the connector or harness.
Disconnect the generator (10300).
1. Disconnect the generator electrical connectors.
2. Remove the battery positive cable nut.
4. Remove the generator.
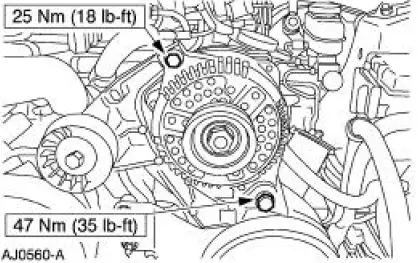
- Remove the upper and lower generator bolts.
5. To install, reverse the removal procedure.
 Generator and Regulator
General Specifications
Torque Specifications
Generator
The charging system consists of the:
generator (GEN)
internal voltage regulator
The generator has an internal voltage regulato ...
 Generator - 4.6L 2V
Removal and Installation
1. Disconnect the battery (10655). For additional information, refer
to Section.
2. Relieve the accessory drive belt (8620) tension and remove the belt
from the gen ...
Other materials:
Installation
1. NOTE: Inspect the spring insulators for wear or damage. Install new
spring insulators if
necessary.
Make sure the spring insulators are correctly installed on the springs.
2. Install the springs.
1. Position the springs.
2. Raise the subframe using ...
General information
WARNING: Driving while distracted can result in loss of vehicle
control, accident and injury. Ford strongly recommends that drivers
use extreme caution when using any device or feature that may take their
focus off the road. Your primary responsibility is the ...
Refrigerant Identification Testing
Special Tool(s)
Refrigerant Identifier with Air-
Radicator
198-00003 or equivalent
1. NOTE: An A/C refrigerant analyzer must be used to identify gas
samples taken directly from the
refrigeration system or storage containers prior to recoveri ...
