Ford Mustang (1999-2004) Service Manual: Installation
1. CAUTION: To prevent refrigerant system contamination, do not allow dirt or other foreign materials to enter the A/C compressor.
Clean the A/C compressor nose area.
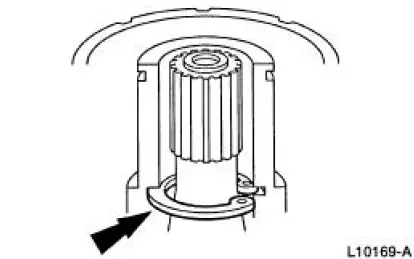
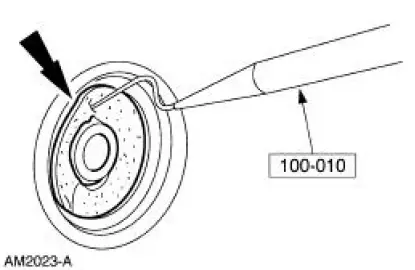
2. Place the shaft seal on the special tool. Lubricate the shaft seal and the special tool with PAG oil or equivalent.
3. Position the shaft seal and the special tool over the A/C compressor shaft.
4. Using the special tool, push the shaft seal onto the A/C compressor shaft until seated.
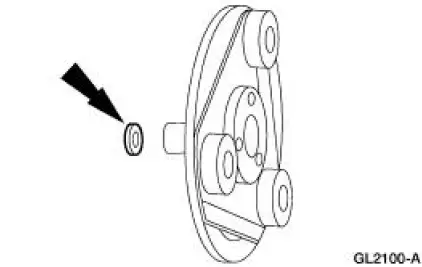
5. Install the shaft seal snap ring.
6. Carry out the A/C compressor external leak test. For additional information, refer to Component Tests in Section.
7. Install the shaft seal felt.
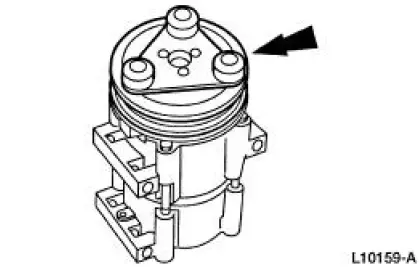
8. Install the A/C clutch hub spacer.
9. Install the A/C disc and hub assembly.
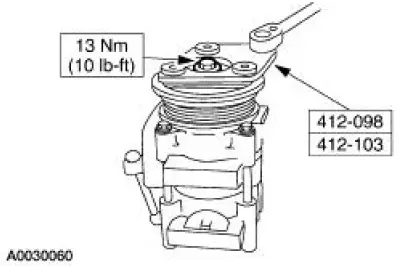
10. Using the special tool, install the A/C disc and hub assembly retaining bolt.
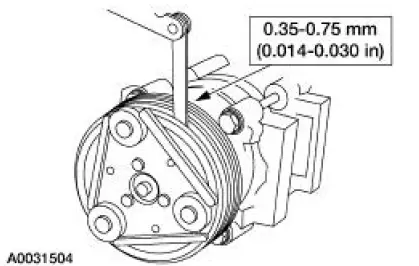
11. Measure and adjust the clutch air gap by removing or adding spacers as needed.
12. Install the A/C compressor. For additional information, refer to Air Conditioning (A/C) Compressor-3.8L or Air Conditioning (A/C) Compressor-4.6L in this section.
Evaporator Core
Removal and Installation
NOTE: The evaporator core is not separately serviceable, it is serviced only with the evaporator core housing assembly.
NOTE: Installation of a new suction accumulator is not required when repairing the air conditioning system except when there is physical evidence of contamination from a failed A/C compressor or damage to the suction accumulator.
NOTE: If an evaporator core leak is suspected, the evaporator core must be leak tested before it is removed from the vehicle. For additional information, refer to Section.
1. Remove the evaporator core housing. For additional information, refer to Section.
2. Transfer the components from the old evaporator core housing to the new evaporator core housing.
3. Install the evaporator core housing. For additional information, refer to Section.
 Removal
1. Remove the A/C compressor (19703). For additional information, refer to
Air Conditioning (A/C)
Compressor-3.8L or Air Conditioning (A/C) Compressor-4.6L in this section.
2. Remove the bolt.
1. ...
 Suction Accumulator
Material
Item
Specification
PAG Refrigerant Compressor
Oil (R-134a Systems)
F7AZ-19589-DA (Motorcraft YN-
12-C)
WSH-M1C231-
B
Removal and Installation
1. Recover the refriger ...
Other materials:
Evaporative Emission Canister
Removal and Installation
1. WARNING: The evaporative emission system contains fuel vapor
and condensed
fuel vapor. Although not in large quantities, it still presents the
danger of explosion or
fire. Disconnect the battery ground cable from the bat ...
Compressor Manifold and Tube Assembly - 3.8L
Material
Item
Specification
PAG Refrigerant Compressor
Oil (R-134a Systems)
F7AZ-19589-DA (Motorcraft YN-
12-C)
WSH-M1C231-
B
Removal and Installation
NOTE: Installation of a new suction accumulator is not required when
repairing the ...
Trim Panel - Upper Quarter
Special Tool(s)
Safety Belt Bolt Bit
501-010 (T77L-2100-A)
Removal and Installation
1. Remove the rear seat cushion.
2. Using the special tool, remove the rear safety belt anchor bolt.
3. Remove the screw and the coat hook.
4. Open the ...
