Ford Mustang (1999-2004) Service Manual: Speakers
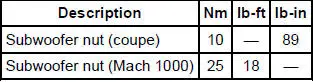
Torque Specifications
Speakers
NOTE: Premium sound speakers (18808) are labeled with either 6 OHMS or 8 OHMS.
- The coupe has a four-speaker system, with two door-mounted speakers and two in the package tray panel (46506).
- On the convertible, the two rear speakers are located behind the quarter trim panel. (31012)
- The MACH 460 subwoofer system has eight speakers. On the coupe, two are located in each door and four are in the subwoofer assembly. On the convertible, two speakers are in each door and two are mounted in each subwoofer assembly behind the rear quarter trim panels. Both the coupe and convertible subwoofer assemblies are not repairable.
- The MACH 1000 has all the components of the MACH 460 system plus two additional subwoofers located on each side of the trunk and four additional amplifiers. These subwoofers can be serviced independently.
 Cable - Antenna Lead In
Removal
1. Remove the audio unit. Refer to Section.
2. Lower the glove compartment by releasing the stops from the
instrument panel.
3. Disconnect the antenna in-line connector.
4. Remove ...
 Door Speaker - Upper
Removal and Installation
1. Remove the front door trim panels (239420). For additional
information, refer to Section
2. Remove the upper speaker access cover.
3. Remove the upper speaker hous ...
Other materials:
Wheel Bearing Check
1. WARNING: The electrical power to the air suspension system must be
shut off prior
to hoisting, jacking or towing an air suspension vehicle. This can be
accomplished by
turning off the air suspension switch. Failure to do so can result in unexpected
infla ...
Frame and Mounting
Frame and Body Mounting
Torque Specifications
Frame Assembly
Underbody misalignment can affect front and rear wheel alignment, the
operation of the suspension
parts and drivetrain operation. Window glass cracks, door and window opening
concerns, and air or ...
System Bleeding
1. If required, remove the hydraulic system from the vehicle. Refer
to Hydraulic System, Lift
Cylinder and Motor in this section.
2. Remove the fill plug at the end of the hydraulic pump.
3. Fill the pump with Mercon Multi-Purpose Automatic Transmiss ...
