Ford Mustang (2005-2014) Owners Manual: Steering Wheel
Adjusting the steering wheel
WARNING: Do not adjust the steering wheel when your vehicle is moving.
Note: Make sure that you are sitting in the correct position. See Sitting in the Correct Position in the Seats chapter.
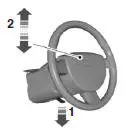
1. Unlock the steering column.
2. Adjust the steering wheel to the
desired position.
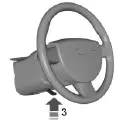
3. Lock the steering column.
AUDIO CONTROL (IF EQUIPPED)
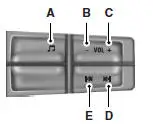
A. Media
B. Volume down
C. Volume up
D. Seek up or next
E. Seek down or previous
Press the media button repeatedly to scroll through available audio modes.
Press the seek buttons to select the next or previous stored preset or track. Press and hold to select the next or previous frequency or seek through a track.
VOICE CONTROL (IF EQUIPPED)
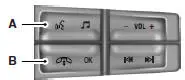
A. Voice recognition
B. Phone mode
See the SYNC or Navigation System chapter.
CRUISE CONTROL
See the Cruise Control chapter.
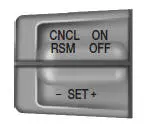
INFORMATION DISPLAY CONTROL
Type 1
Type 2
See the Information Displays chapter.
 Anti-theft system
The active anti-theft system is designed to warn you in the event of
unauthorized vehicle entry and is also designed to help prevent
unwanted towing of the vehicle.
You can choose what is monitored b ...

Other materials:
Spring Lock Couplings
Special Tool(s)
Disconnect Tool, Spring Lock
Coupling (3/8 inch yellow)
310-D004 (D87L-9280-A) or
equivalent
Disconnect Tool, Spring Lock
Coupling (1/2 inch green)
310-D005 (D87L-9280-B) or
equivalent
Material
Item
...
Installation
All vehicles
1. NOTE: If the valve cover is not secured within four minutes, the sealant
must be removed and
the sealing area cleaned with metal surface cleaner. Allow to dry until there is
no sign of
wetness, or four minutes, whichever is longer. Failure to ...
Air Conditioning (A/C) Compressor - 3.8L
Material
Item
Specification
PAG Refrigerant Compressor
Oil (R-134a Systems)
F7AZ-19589-DA (Motorcraft YN-
12-C)
WSH-M1C231-
B
Removal and Installation
CAUTION: If installing a new air conditioning compressor due to an
internal failur ...
