
Ford Mustang (2005-2014) Owners Manual: USB port
WARNING: Driving while distracted can result in loss of vehicle control, crash and injury. We strongly recommend that you use extreme caution when using any device that may take your focus off the road. Your primary responsibility is the safe operation of your vehicle. We recommend against the use of any hand-held device while driving and encourage the use of voice-operated systems when possible.
Make sure you are aware of all applicable local laws that may affect the use of electronic devices while driving.
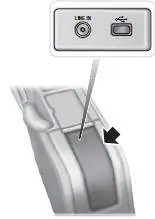
The USB port allows you to plug in media playing devices, memory sticks and charge devices (if supported). See the SYNC chapter for more information.
There is a notch on the side of the console as indicated. To prevent the console lid from crushing the cable, route the cable through the notch.
 Auxiliary input jack
WARNING: Driving while distracted can result in loss of vehicle
control, crash and injury. We strongly recommend that you use
extreme caution when using any device that may take your focus off
the roa ...
 SYNC®
SYNC®
SYNC is an in-vehicle communications system that works with your
Bluetooth-enabled cellular phone and portable media player. This allows
you to:
• Make and receive calls.
• Access and play music ...
Other materials:
Actuator Cable - Speed Control-Cobra
1. Remove the speed control actuator cable end from the throttle body.
1. Lift the speed control cable from the throttle nailhead.
2. Release the speed control cable from the throttle bracket.
2. Remove the speed control cable from the retaining cli ...
Exhaust Manifold RH
Special Tool(s)
Lifting Bracket, Engine
303-D088 (D93P-6001-A2)
Support Bar, Engine
303-290-A
Removal and Installation
1. Install the special tool.
2. Install the special tools.
3. Raise and support the vehicle. For additional ...
Removal
1. Disconnect the battery ground cable. For additional information, refer
to Section.
2. Drain the engine cooling system. For additional information, refer to
Section .
3. Remove the crankshaft pulley. For additional information, refer to
Crankshaft ...
