
Ford Mustang (1999-2004) Service Manual: Vehicle Certification (VC) Label Locator
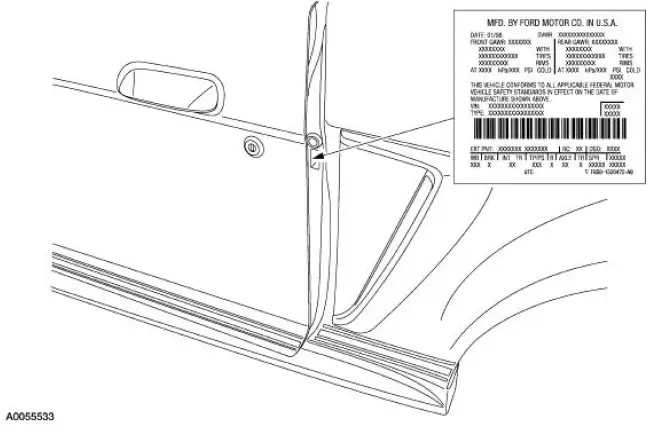
The upper portion of the vehicle certification (VC) label contains the manufacturer name, the month and year of manufacture, the certification statement and the VIN. It also includes gross vehicle weight ratings (GVWR). The VC label is located on the left-hand door jamb.
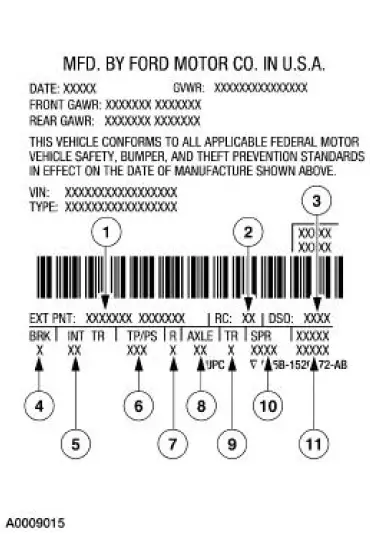
| Item | Description |
| 1 | Exterior paint color code |
| 2 | Region code |
| 3 | Special order code (DSO - domestic special order/ FSO - foreign special order/ PTO - paint, tire option special order) |
| 4 | Brake type code |
| 5 | Interior trim code |
| 6 | Tape/paint stripe code |
| 7 | Radio type code |
| 8 | Axle ratio code |
| 9 | Transmission code |
| 10 | Spring code |
| 11 | Powertrain calibration code |
Vehicle Certification (VC) Label Reference
 Vehicle Identification Number (VIN) Locator
The vehicle identification number (VIN) is a seventeen-digit alphanumeric
code. The VIN is stamped
on a metal tab riveted to the instrument panel, top upper left of the dash. The
VIN number is als ...
 Paint Codes
The first set of paint code letters/numbers listed indicate the vehicle
primary body color. The second
set of paint code letters/numbers listed (if applicable) indicate a two-tone or
accent body co ...
Other materials:
Touchscreen climate controls
Press the CLIMATE hard button to access your climate control features.
Depending on your vehicle line and option package, your climate screen
may look different from the screen shown here.
Climate Control Voice Commands
If you are not viewing the climate co ...
Engine (Assembly)
Special Tool(s)
Guides, Connecting Rod
303-442 (T93P-6136-A)
Installer, Crankshaft Rear Oil
Seal
303-518 (T95P-6701-DH)
Installer, Crankshaft Rear Oil
Seal
303-516 (T95P-6701-BH)
Installer, Crankshaft Re ...
Transmission (INSTALLATION)
Special Tool(s)
Retainer, Torque Converter
307-346 (T97T-7902-A)
Material
Item
Specification
Multi-Purpose Grease
D0AZ-19584-AA
ESB-M1C93-
B
MERCON V Automatic
Transmission Fluid
XT-5-QM, XT-5-DM
MERCON V
1. CA ...
