Ford Mustang (1999-2004) Service Manual: Flywheel Runout Check
Special Tool(s)
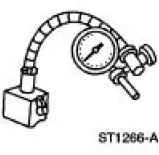 |
Dial Indicator/Magnetic Base 100-D002 (D78P-4201-B) or equivalent |
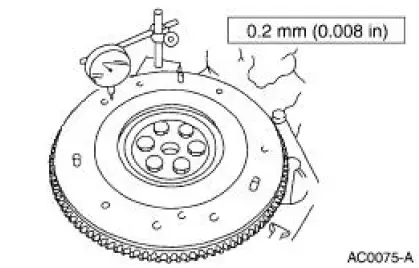
1. Mount the special tool so that the indicator contact point rides on the clutch disc contact surface.
2. Turn the flywheel (6375); if the runout exceeds the maximum allowance, install a new flywheel.
Bearing
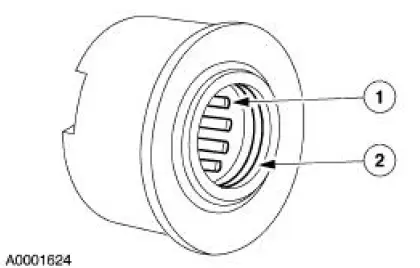
1. CAUTION: The pilot bearing is a sealed bearing and must not be immersed in any type of cleaning fluid.
Inspect the pilot bearing (7118) for:
1. needle rollers for scoring, worn or broken rollers, cracked roller cage inadequate grease or discoloration.
2. seal leakage.
- misalignment and looseness in the crankshaft.
 Pressure Plate Check
1. Check the clutch pressure plate surface for scoring, cracks or
discoloration. Minor scratches or
discoloration should be removed with a fine emery cloth.
2. Measure the flatness of the clutch ...
 Dowels - Flywheel
Removal
1. NOTE: Take care not to damage the flywheel dowel holes or the
surface areas around the
flywheel dowel during removal.
Remove the flywheel dowels by using a drift pin where the flywhee ...
Other materials:
Bypass Tube - Mach I
Material
Item
Specification
Motorcraft Premium Gold
Engine Coolant
VC-7-A (in Oregon VC-7-B)
(yellow color)
WSS-M97B51-
A1
Removal and Installation
1. Remove the air intake scoop and bracket. For additional information, refer
to Sec ...
Assembly
1. CAUTION: 118 ml (4 oz) of the specified Ford Friction Modifier must
be used in the
axle.
Lubricate each steel clutch plate and soak all friction plates for no less than
15 minutes.
Use Additive Friction Modifier C8AZ-19B546-A or equivalent meeting Ford ...
Stabilizer Bar - Cobra
Removal
CAUTION: Suspension fasteners are critical parts because they affect
performance of vital
components and systems and their failure can result in major service expense. A
new part with
the same part number must be installed if installation becomes nec ...
