Ford Mustang (1999-2004) Service Manual: Starter Motor - 4.6L
Removal
WARNING: When servicing starter motor (11002) or carrying out other underhood work in the vicinity of the starter motor, be aware that the heavy gauge battery input lead at the starter solenoid (11390) is "electrically hot" at all times. A protective cap or boot is provided over this terminal that must be installed after servicing. Be sure to disconnect the battery negative cable before servicing the starter. Failure to follow these instructions can result in personal injury.
WARNING: When working in area of the starter motor, be careful to avoid touching hot exhaust components. Failure to follow these instructions can result in personal injury.
NOTE: When working on the starter system, make sure the anti-theft system is deactivated (if equipped.)
1. Disconnect the battery ground cable. For additional information, refer to Section.
2. Raise and support the vehicle. For additional information, refer to Section.
3. Remove the red starter solenoid safety cap.
4. Remove the starter solenoid nuts and position aside the wires.

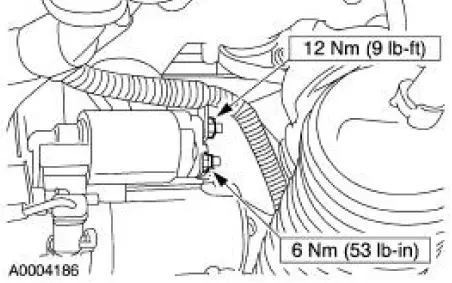
5. NOTE: To ease removal, remove the upper, concealed bolt first.
Remove the three starter motor bolts.
6. Remove the starter motor.
Installation
1. Position the starter motor to the engine.
2. NOTE: To ease installation, first install the two lower bolts finger tight, then install the upper, concealed bolt. Tighten all three bolts to specification.
Install the three starter motor bolts.
3. Connect the starter motor solenoid and starter motor cable connections.
4. Install the red starter solenoid safety cap.
5. Lower the vehicle.
6. Connect the battery ground cable.
 Starter Motor - 3.8L
Removal
WARNING: When servicing starter motor (11002) or carrying out other
underhood work in
the vicinity of the starter motor, be aware that the heavy gauge battery
input lead at the starter
...
 Engine Ignition - 3.8L
General Specifications
Torque Specifications
...
Other materials:
Under hood overview
3.7L V6 Engine
A. Battery
B. Engine oil dipstick
C. Engine oil filler cap
D. Brake fluid reservoir
E. Air filter assembly
F. Engine coolant reservoir
G. Windshield washer fluid reservoir
H. Power distribution box
5.0L V8 Engine
A. Battery
B. Engine oil fille ...
Dowels - Flywheel Housing to Block
Removal
1. NOTE: Take care not to damage the flywheel housing to block dowel
holes or the surface areas
around the flywheel housing to block dowel hole during removal.
Remove the two flywheel housing to block dowels using a drift pin where the
flywheel ...
Differential Case and Ring Gear - Conventional
Special Tool(s)
2-Jaw Puller
205-D072 (D97L-4221-A) or
equivalent
Installer, Differential Side
Bearing
205-010 (T57L-4221-A2)
Step Plate
205-D061 (D83T-4205-C2) or
equivalent
...
