Ford Mustang (2005-2014) Owners Manual: Adjusting the headlamps
The headlamps on your vehicle are properly aimed at the assembly plant.
If your vehicle has been in an accident, an authorized dealer should check the alignment of your headlamps.
Vertical Aim Adjustment
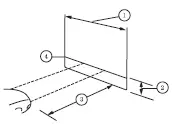
1. Park the vehicle directly in front of a wall or screen on a level surface, approximately 25 ft (7.6 m) away.

• (1) 8 ft (2.4 m)
• (2) Center height of lamp to
ground
• (3) 25 ft (7.6 m)
• (4) Horizontal reference line
2. Measure the height from the center of your headlamp to the ground
and mark an 8 ft (2.4 m) horizontal reference line on the vertical wall or
screen at this height (a piece of masking tape works well). The center of
the lamp is marked by a 3 millimeter circle on the headlamp lens.
3. Turn on the low beam headlamps to illuminate the wall or screen and
open the hood. To see a clearer light pattern for adjusting, block the
light from one headlamp while adjusting the other.


On the wall or screen, you will observe a flat zone of high intensity light located at the top of the right hand portion of the beam pattern.
If the top edge of the high intensity light zone is not at the horizontal reference line, the headlamp will need to be adjusted.
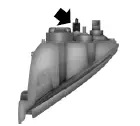
4. Locate the vertical adjuster on
each headlamp.
5. Then use a 7 mm Allen wrench or a Phillips screwdriver to adjust the
vertical aim of the headlamp. HORIZONTAL AIM IS NOT REQUIRED
FOR THIS VEHICLE AND IS NON-ADJUSTABLE.
6. Close the hood and turn off the lamps.
 Air filter check
WARNING: To reduce the risk of vehicle damage and or
personal burn injuries, do not start your engine with the air
cleaner removed and do not remove it while the engine is running.
Note: Failure to us ...
 Changing a bulb
Lamp Assembly Condensation
Exterior lamps are vented to accommodate normal changes in pressure.
Condensation can be a natural by-product of this design. When moist air
enters the lamp assembly throug ...
Other materials:
Entertainment
Your system offers many media options. You can access these options
using the touchscreen or voice commands.
AM/FM Radio
Press the RADIO hard button.
To change between AM, FM1 and FM2, touch the AM or FM
tab. You can also access satellite radio by pressing t ...
Removal
1. Remove the center instrument panel register.
2. Remove the screws.
3. Disconnect the connectors.
4. Using the special tool, disconnect the temperature control cable from the
control head.
5. Remove the nuts and disconnect the vacuum connector.
...
Fuel System (Description and Operation)
Component Location
WARNING: Do not smoke or carry lighted tobacco or open flame of any
type when
working on or near any fuel-related components. Highly flammable mixtures are
always present
and may be ignited, resulting in possible personal injury ...
