Ford Mustang (1999-2004) Service Manual: Camshaft Journal - Clearance, Plastigage Method
Special Tool(s)
|
|
Plastigage 303-D031 (D81L-6002-B) or equivalent |
NOTE: The camshaft journals must meet specifications before checking camshaft journal clearance.
1. Remove the camshaft bearing cap and lay Plastigage across the surface. Refer to the appropriate section in Group 303 for the procedure.
2. NOTE: Do not turn the camshaft while carrying out this procedure.
Position the camshaft bearing cap and install the bolts. Refer to the appropriate section in Group 303 for the procedure.
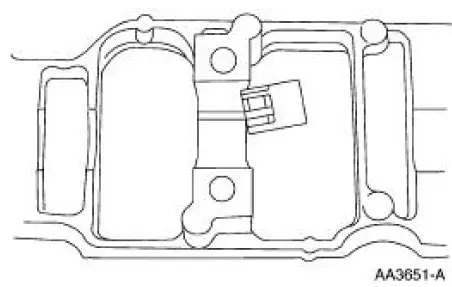
3. Use Plastigage to verify the camshaft journal clearance.
- If out of specification, install new components as necessary. Refer to the appropriate section in Group 303 for the procedure.
 Push Rods - Inspection
1. CAUTION: Do not attempt to straighten push rods.
Check the ends of the push rods for nicks, grooves, roughness or
excessive wear. Install new
push rods as necessary. Refer to the appropriate se ...
 Camshaft End Play - Push Rod Engines
Special Tool(s)
Dial Indicator Gauge with
Holding Fixture
100-002 (TOOL-4201-C) or
equivalent
1. Remove the valve tappets. Refer to the appropriate section in Group 303
for the pr ...
Other materials:
Removal
CAUTION: Suspension fasteners are critical parts because they affect
performance of vital
components and systems and their failure can result in major service expense. A
new part with
the same part number must be installed if installation becomes necessary. ...
Heated Window Grid Wire Repair
Material
Item
Specification
Dark Walnut Metallic Acrylic
Lacquer Touch-up Paint
ALBZ-19500-5858A or
equivalent
ESR-M2-P100-
C
Rear Window Defroster Repair
D8AZ-19562-AA or equivalent
WSB-M4J58-B
1. NOTE: A single break or an ...
Installation
1. Install the RH engine insulator.
Install the nuts.
Install the bolts.
2. Install the LH engine insulator.
3. Connect the engine ground strap.
4. Install the bracket.
5. Lower the vehicle.
6. Lower the engine.
7. Raise the vehicle.
8. Ins ...
