Ford Mustang (2005-2014) Owners Manual: Closing the convertible top
Note: The convertible top will not operate unless the vehicle is stationary or traveling under 3 mph (5 kmh).
Note: Make sure that the latch handles are pulled down and in the fully opened position before the top makes contact with the windshield header. This allows for hand clearance and proper closure of the top.
To close the convertible top:
1. Bring the vehicle to a complete stop. The ignition must be on. It is recommended that the engine is running when opening the top to prevent draining the battery.
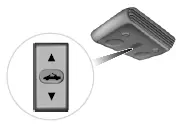
2. Press and hold the convertible top switch until the windows lower completely and the top unfolds and moves forward toward the windshield header.
Make sure the latch handles are pulled down and in the fully opened position before the top and the windshield header make contact.
3. Continue pressing the convertible top switch to cl
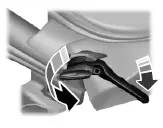
4. Pull down on the drivers latch
handle and rotate it all the way
forward into the windshield header.
5. Press the latch handle up into
the stowed position to secure the
latch.
6. Pull down on the passengers side
latch handle and rotate it all the
way forward into the windshield
header.
7. Press the latch handle up into the stowed position to secure the latch.
Note: If the top has been open for an extended period of time or if the temperature is low, the top material may shrink slightly. If this happens, pull on the latch handles or the center grip to fasten to top
 Using the boot
Installing the Boot
WARNING: Always secure the retaining clips and boot straps on
the vehicle or the boot may come loose while driving.
Note: Be sure the boot is secure on the vehicle before driving. ...
 Driving Hints
...
Other materials:
Air Bag Disposal - Undeployed Inoperative
WARNING: Always wear safety glasses when repairing an air bag
supplemental restraint
system (SRS) vehicle and when handling an air bag module. This will
reduce the risk of injury
in the event of an accidental deployment.
WARNING: Never probe the c ...
Installing child seats
Child Seats
Use a child safety seat (sometimes
called an infant carrier, convertible
seat, or toddler seat) for infants,
toddlers or children weighing
40 pounds (18 kilograms) or less
(generally age four or younger).
Using Lap and Shoulder Belts
WARNING: Airb ...
Evaporator Core Orifice
NOTE: The evaporator core orifice is an integral part of the condenser
to evaporator line and should
be installed as an assembly with the line.
NOTE: A new evaporator core orifice should be installed whenever a new
A/C compressor is installed.
The evapora ...
