Ford Mustang (2005-2014) Owners Manual: Driving through water
WARNING: Drive through water in an emergency only, and not as part of normal driving.
WARNING: Engine damage can occur if water enters the air filter.
Note: Driving through deep water may allow water into the transmission or air intake and can cause internal vehicle damage or cause it to stall.
Note: Once through the water, always dry the brakes by moving your vehicle slowly while applying light pressure on the brake pedal.
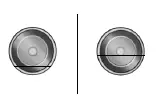
If driving through deep or standing water is unavoidable, proceed very slowly. Never drive through water that is higher than the bottom of the wheel rims (for cars) or the bottom of the hubs (for trucks).

When driving through water, traction or brake capability may be limited. Also, water may enter your engine’s air intake and severely damage your engine or your vehicle may stall.
Wet brakes do not stop the vehicle as quickly as dry brakes.
 Economical driving
Fuel economy is affected by several things, such as how you drive, the
conditions you drive under and how you maintain your vehicle.
There are some things to keep in mind that may improve your fuel
e ...
 Floor mats
WARNING: Always use floor mats that are designed to fit the
footwell of your vehicle. Only use floor mats that leave the pedal
area unobstructed. Only use floor mats that are firmly secured to
retent ...
Other materials:
Removal
1. Raise and support the vehicle.
2. Remove the wheel and tire assembly.
3. WARNING: Brake fluid contains polyglycol ethers and polyglycols.
Avoid contact
with eyes. Wash hands thoroughly after handling. If brake fluid contacts
eyes, flush eyes ...
Cleaning the alloy wheels
Note: Do not use chrome cleaner, metal cleaner or polish on wheels and
wheel covers.
A clearcoat paint finish coats aluminum wheels and wheel covers.
In order to maintain their condition:
• Clean weekly with Motorcraft Wheel and Tire Cleaner. Use a sponge ...
Assembly
1. NOTE: Universal joint kits are to be installed as complete
assemblies only. Do not mix
components from other U-joint kits.
Install the spider.
1. Start a new bearing cup into the driveshaft yoke.
Check the needle bearings for correct positioning.
...
