Ford Mustang (1999-2004) Service Manual: Ignition Coil - Coil On Plug
Removal
1. Disconnect the battery ground cable (14301). For additional information, refer to Section.
2. Remove the air cleaner outlet tube (9B659). For additional information, refer to Section.
3. NOTE: One ignition coil is shown, and the others are similar.
Disconnect the connector from the ignition coil (12029).
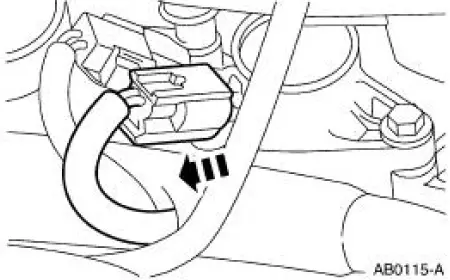
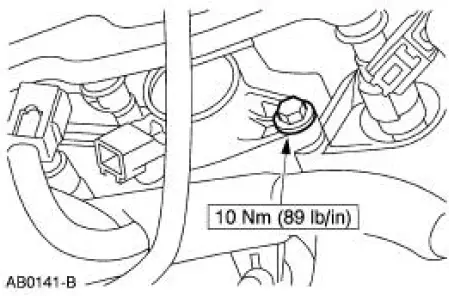
4. Remove the bolt and the ignition coil.
Installation
1. NOTE: Verify the ignition coil spring is correctly located inside the ignition coil boot and there is no damage to the tip of the boot.
To install, reverse the removal procedure.
 Engine Ignition (Description and Operation)
Eight separate ignition coils (12029):
are mounted directly above each spark plug (12405).
are controlled by the powertrain control module (PCM) for correct
firing sequence.
The spark plug ...
 Spark Plug
Removal
1. Remove the ignition coil on plug. For additional information, refer to
Ignition Coil-Coil On Plug
in this section.
2. NOTE: Use compressed air to remove any foreign material from the ...
Other materials:
Inspection and Assembly Requirements - Following an
A/C
Compressor Failure
CAUTION: To prevent refrigerant system contamination and possible
failure of the new
A/C compressor, carry out the following procedures.
1. NOTE: A dirty A/C evaporator core orifice or a condenser to
evaporator tube containing black
refrigerant oil and parti ...
Transmission (Removal)
1. Remove the gearshift lever knob.
2. Remove the console panel gearshift plate. Disconnect the cigar lighter
electrical connector, then
lift the gearshift lever boot over the gearshift lever.
3. Remove the bolts and the upper gearshift lever.
4. Remove ...
Actuator - Door Lock
Removal
1. Remove the door trim panel (23942). For additional information,
refer to Section.
2. Remove the door latch (21812). For additional information, refer to
Latch-Door .
3. Remove the door ajar switch.
Release the locking tab.
4 ...
