Ford Mustang (1999-2004) Service Manual: Installation
1. CAUTION: Install the brake pads in full axle sets. Do not install new brake pads on only one side of vehicle.
Install the new slipper and brake pads.
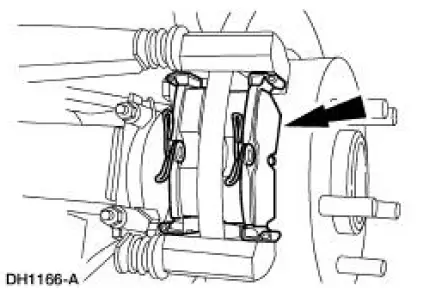
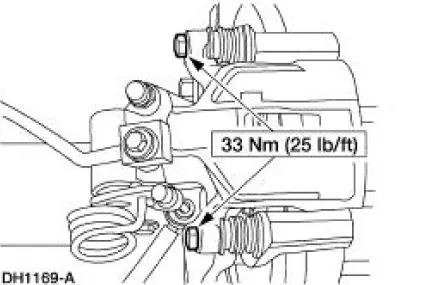
2. Position the caliper on the anchor plate and install the bolts.
3. Install the wheel and tire assembly.
4. Lower the vehicle.
5. WARNING: Use of any other than approved DOT 3 or DOT 4 brake fluid will cause permanent damage to components and will render the brakes inoperative.
WARNING: Brake fluid contains polyglycol ethers and polyglycols. Avoid contact with eyes. Wash hands thoroughly after handling. If brake fluid contacts eyes, flush eyes with running water for 15 minutes. Get medical attention if irritation persists. If taken internally, drink water and induce vomiting. Get medical attention immediately.
CAUTION: Brake fluid is harmful to painted or plastic surfaces. If brake fluid is spilled onto a painted or plastic surface, immediately wash it with water.
Check the fluid level at the master cylinder. Add fluid if necessary.
6. WARNING: Pump the brake pedal several times to make sure the caliper piston is extended to its operating position. Failure to follow these instructions may result in personal injury.
Verify correct brake operation.
7. Recheck the master cylinder fluid level.
 Removal
1. Use a suitable suction device to lower the brake fluid level in
the master cylinder reservoir.
2. Raise and support the vehicle.
3. Remove the wheel and tire assembly.
4. Inspec ...
 Disc
Disc
Removal
1. Remove the rear disc support bracket (2B511). For additional
information, refer to Support
Bracket in this section.
2. Remove the brake disc (2C026).
Installation
1. Follow the ...
Other materials:
Lumbar Assembly
Removal and Installation
All vehicles
1. Remove the front seat. For additional information, refer to Seat-Front
Power in this section.
2. Release the J-clip.
3. Remove the seat backrest latch handle knob (62762).
4. Pull the seat backrest trim cover ...
Register - LH
Removal
1. Remove the instrument panel steering column cover bolts.
2. Unsnap and remove the instrument panel steering column cover.
3. Remove the bolts and the steering column reinforcement.
4. Remove the screws.
5. Remove the register.
Installation ...
Instrument Panel - Center Finish Panel
Removal and Installation
All vehicles
1. Disconnect the battery ground cable. For additional information,
refer to Section.
Vehicles with automatic transmission
2. Place the selector lever in the 1 position.
Vehicles with manual transmission
3. ...
