Ford Mustang (1999-2004) Service Manual: Manual
WARNING: Brake fluid contains polyglycol ethers and polyglycols. Avoid contact with eyes. Wash hands thoroughly after handling. If brake fluid contacts eyes, flush eyes with running water for 15 minutes. Get medical attention if irritation persists. If taken internally, drink water and induce vomiting. Get medical attention immediately.
CAUTION: Do not allow the brake master cylinder reservoir to run dry during the bleeding operation. Keep the brake master cylinder reservoir filled with the specified brake fluid. Never reuse the brake fluid that has been drained from the hydraulic system.
CAUTION: Brake fluid is harmful to painted and plastic surfaces. If brake fluid is spilled onto a painted or plastic surface, immediately wash it with water.
NOTE: When any part of the hydraulic system has been disconnected for repair or installation of new components, air can get into the system and cause spongy brake pedal action. This requires bleeding of the hydraulic system after it has been correctly connected. The hydraulic system can be bled manually or with pressure bleeding equipment.
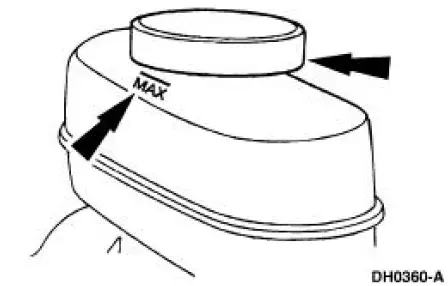
1. Clean all dirt from and remove the brake master cylinder filler cap and fill the brake master cylinder reservoir with the specified brake fluid.
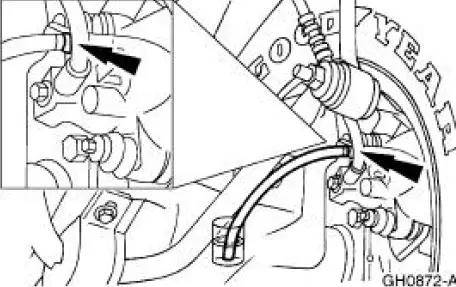
2. Place a box end wrench on the RH rear bleeder screw. Attach a rubber drain tube to the RH rear bleeder screw and submerge the free end of the tube in a container partially filled with clean brake fluid.
3. Have an assistant pump the brake pedal and then hold firm pressure on the brake pedal.
4. Loosen the RH rear bleeder screw until a stream of brake fluid comes out. While the assistant maintains pressure on the brake pedal, tighten the RH rear bleeder screw.
- Repeat until clear, bubble-free fluid comes out.
- Refill the brake master cylinder reservoir as necessary.
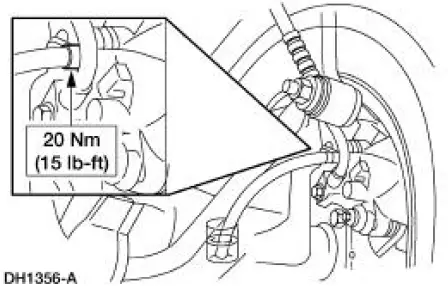
5. Tighten the RH rear bleeder screw.
6. Repeat Steps 2, 3, 4 and 5 for the LH rear bleeder screw.
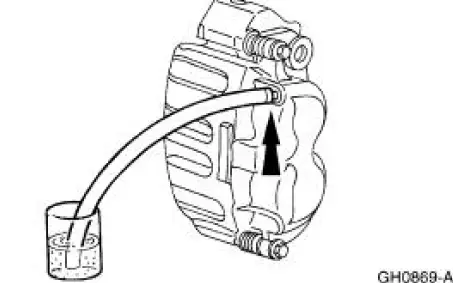
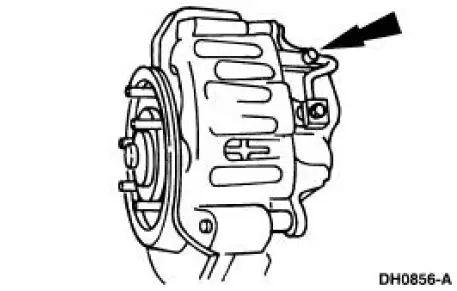
7. Place a box end wrench on the RH front disc brake caliper bleeder screw. Attach a rubber drain tube to the RH front disc brake caliper bleeder screw, and submerge the free end of the tube in a container partially filled with clean brake fluid.
8. Have an assistant pump the brake pedal and then hold firm pressure on the brake pedal.
9. Loosen the RH front disc brake caliper bleeder screw until a stream of brake fluid comes out.
While the assistant maintains pressure on the brake pedal, tighten the RH front disc brake caliper bleeder screw.
- Repeat until clear, bubble-free fluid comes out.
- Refill the brake master cylinder reservoir as necessary.
10. Tighten the RH front disc brake caliper bleeder screw. For additional information, refer to Specifications in this section.
11. Repeat Steps 7, 8, 9 and 10 for the LH front disc brake caliper bleeder screw.

 Pressure
1. Clean all dirt from and remove the brake master cylinder filler
cap and fill the brake master
cylinder reservoir with the specified brake fluid.
2. NOTE: Master cylinder pressure bleeder ada ...
Other materials:
Pinpoint Tests
PINPOINT TEST A: THE ENGINE DOES NOT CRANK AND THE
RELAY DOES CLICK
Test Step
Result / Action to Take
A1 CHECK THE VOLTAGE TO THE STARTER RELAY
YesGO to A2 .
No
REPAIR circuit 1050 (LG/VT) for an open. TEST the
system for normal operation. ...
Transmission (Disassembly)
Special Tool(s)
Bearing Puller
205-D064 (D84L-1123-A) or
Equivalent
Front Hub Tool
204-069 (T81P-1104-C)
Holding Fixture
307-003 (T57L-500-B)
Impact Slide Hammer
100-001 (T50T-100-A)
Puller
...
Vehicle certification label
The National Highway Traffic Safety
Administration Regulations require
that a Safety Compliance Certification
Label be affixed to a vehicle and
prescribe where the Safety Compliance
Certification Label may be located.
The Safety Compliance Certification
Labe ...
