Ford Mustang (1999-2004) Service Manual: Oil Filter Adapter
Removal
1. Drain the cooling system. For additional information, refer to Section.
2. Disconnect the lower radiator hose.
3. Raise the vehicle. For additional information, refer to Section.
4. Drain the engine oil.
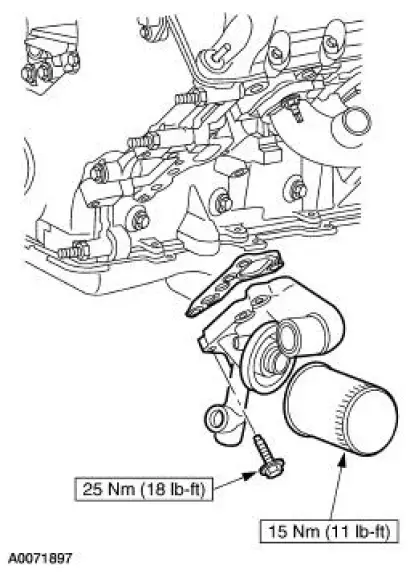
5. Remove the oil filter adapter.
1. Remove the oil filter.
2. Remove the bolts.
3. Remove the oil filter adapter.
4. Remove the gasket.

6. Clean and inspect the oil filter adapter.
- Flush the oil filter adapter with parts cleaner. If metal particles are present in the adapter, install a new adapter.
Installation
1. To install, reverse the removal procedure.
 Exhaust Manifold LH
Removal and Installation
1. Position the steering wheel straight ahead and lock the column.
2. Disconnect the battery ground cable. For additional information, refer to
Section.
3. Raise the vehicl ...
 Oil Level Indicator and Tube
Removal
1. Remove the oil level indicator.
2. Remove the LH exhaust manifold. For additional information, refer to Exhaust
Manifold LH in
this section.
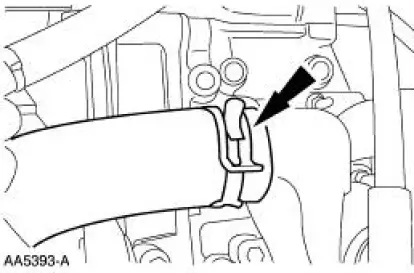
3. Remove the bolt.
4. Remove the oil level ...
Other materials:
Connect
1. Install the A/C tube lock coupling spring.
2. Lubricate the inside of the coupling with PAG Refrigerant Compressor Oil
(R-134a Systems) or
equivalent.
3. CAUTION: Use only the new O-ring seals. The use of any O-ring seals
other than
those specified in ...
Latch - Luggage Compartment Lid
Removal
1. NOTE: The luggage compartment lid latch is equipped with
mechanical interior release handle.
Disconnect the luggage compartment lid lock actuator (432A38) cable.
2. Remove the luggage compartment lid latch (43200).
1. Disconnect the ...
Blower Motor
Removal
1. Disconnect the jumper wire.
2. Disconnect the main harness.
3. Remove the screws.
4. Separate the cover from the motor.
5. Separate the motor from the housing.
6. Disconnect the jumper from the motor.
Remove the blower motor.
Installa ...
