
Ford Mustang (1999-2004) Service Manual: Parking Brake Cable Tension Release
1. CAUTION: If any component in the parking brake system requires repair or if the rear axle housing (4010) is removed, the cable tension must be released.
Place the parking brake control (2780) in the released position.
2. Remove the console.
3. With an assistant inside the vehicle, raise and support the vehicle.
4. Pull the parking brake cable and equalizer rearward.
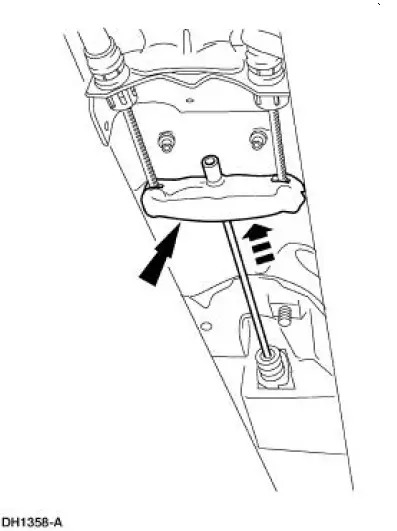
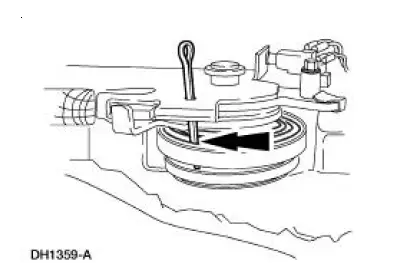
5. CAUTION: Do not remove the steel pin until the parking brake cable and equalizer/rear cable and conduits are connected to the parking brake control. Pin removal releases the tension in the ratchet wheel causing the spring to unwind and release tension.
Insert a steel pin through holes in the lever to the ratchet wheel.
 Parking Brake (Diagnosis and Testing)
Inspection and Verification
1. Verify the customer's concern by operating the parking brake system to
duplicate the condition.
2. Inspect to determine if one of the following mechanical or electrica ...
 Parking Brake Control
Removal
1. CAUTION: If any component in the parking brake system requires
repair or if the
rear axle housing (4010) is removed, the cable tension must be released.
Place the parking brake control (2 ...
Other materials:
Oil Filter Adapter
Material
Item
Specification
Super Premium SAE 5W-20
Motor Oil
XO-5W20 QSP or equivalent
WSS-M2C153-
H
Premium Engine Coolant
VC-4A (In Canada CXC-10; In
Oregon VC-5) or equivalent
ESE-M97B44-
A
Removal and Installation
1. ...
Accessories
For a complete listing of the accessories that are available for your
vehicle, please contact an authorized dealer or visit our online store at
Accessories.Ford.com (United States only).
Ford Custom Accessories are available for your vehicle through an
author ...
Noise, Vibration and Harshness (NVH) (Diagnosis and Testing)
Special Tool(s)
ChassisEAR
107-R2102 or equivalent
Electronic Vibration Analyzer
100-F027 (014-00344) or
equivalent
EngineEAR
107-R2100 or equivalent
Ultrasonic Leak Detector
134-R0135 or equivalent
T ...
