Ford Mustang (1999-2004) Service Manual: A/C Compressor Pressure Relief Valve
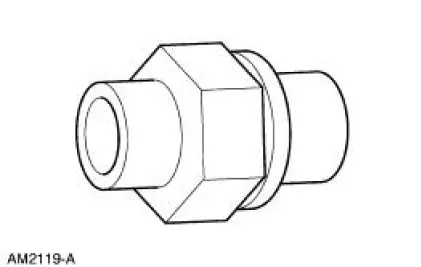
An A/C compressor pressure relief valve is incorporated into the compressor A/C manifold and tube to:
- relieve unusually high refrigerant system discharge pressure buildups. For specifications regarding operating pressure(s), refer to Section.
- prevent damage to the A/C compressor and other system components.
- avoid total refrigerant loss by closing after the excessive pressure has been relieved.
A/C Condenser Core
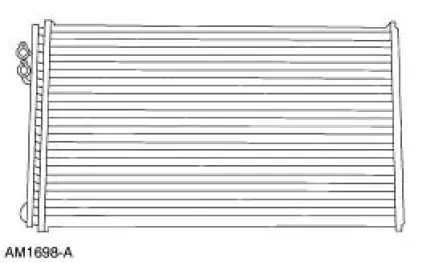
The A/C condenser core has the following characteristics:
- It is an aluminum fin and tube design heat exchanger located in front of the vehicle radiator (8005).
- It cools compressed refrigerant gas by allowing air to pass over fins and tubes to extract heat and by condensing gas to liquid refrigerant as it is cooled.
 A/C Compressor and Clutch Assembly
NOTE: Internal A/C compressor components are not serviced separately.
The FS-10 A/C compressor
is serviced only as an assembly. The A/C clutch pulley, A/C clutch field coil
(19D798) and the shaft
...
 Refrigerant Lines
The condenser to evaporator tube (19835) contains the high pressure liquid
refrigerant upstream of the
evaporator core orifice.
The A/C manifold and tube (19D734) is attached to the A/C compressor, ...
Other materials:
Anti-Lock Control - Traction Control
Torque Specifications
Anti-Lock Control -Traction Control
The four wheel anti-lock brake system (4WABS) with traction control consists
of the following
components:
anti-lock brake control module (2C346)
front anti-lock brake sensor (2C204)/(2C205)
front ...
Heated Oxygen Sensor (HO2S)
Special Tool(s)
Socket, Exhaust Gas Oxygen
Sensor
303-476 (T94P-9472-A)
Material
Item
Specification
Penetrating and Lock Lubricant
or equivalent
E8AZ-19A501-
B
Removal and Installation
1. Disconnect the battery ground ...
Cable and Conduit - Front
Removal
1. CAUTION: If any component in the parking brake system requires
repair or if the
rear axle housing (4010) is removed, the cable tension must be released.
Release the cable tension. For additional information, refer to Parking
Brake Cable Tens ...
